Qubo Qin's Blog

  • Home

  • Archives

How to Use Job Control in Bash to Manage Foreground and Background Processes

Posted on 2019-02-19 | Edited on 2019-02-20 | In Shell

Introduction

We usually encounter the following situation when we use SSH to log on to a remote computer or a server, then start a task in the foreground, and the task is more complex and bigger, it will not be finished in a short peroid of time, but we need to close the terminal for some reasons. If we close the terminal, the process will be terminated too. We don’t want to stop it right now, how can we handle this problem?

Before dealing with this case, you must have some background knowledge about job control in Bash. Let us create a bash job first:

1
ping -i 5 google.com

Terminating a Process

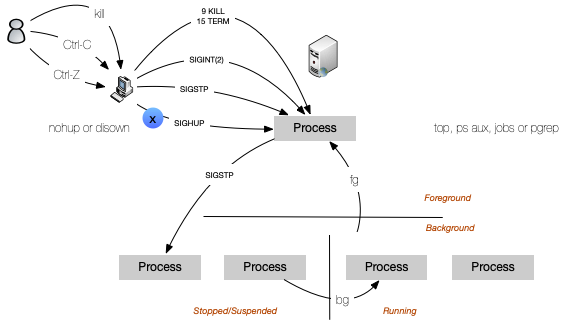
There are 3 ways that can terminate processes in our system.

  1. In a terminal, hold the control key, and press ‘c’. This will stop the process that we have started in the foreground.

    1
    2
    3
    4
    5
    6
    7
    8
    9
    10
    11
    12
    ➜  Magicefire ping -i 5 google.com
    PING google.com (172.217.12.46): 56 data bytes
    64 bytes from 172.217.12.46: icmp_seq=0 ttl=52 time=64.537 ms
    64 bytes from 172.217.12.46: icmp_seq=1 ttl=52 time=63.335 ms
    64 bytes from 172.217.12.46: icmp_seq=2 ttl=52 time=62.896 ms
    64 bytes from 172.217.12.46: icmp_seq=3 ttl=52 time=64.476 ms
    64 bytes from 172.217.12.46: icmp_seq=4 ttl=52 time=63.338 ms
    64 bytes from 172.217.12.46: icmp_seq=5 ttl=52 time=62.164 ms
    ^C
    --- google.com ping statistics ---
    6 packets transmitted, 6 packets received, 0.0% packet loss
    round-trip min/avg/max/stddev = 62.164/63.458/64.537/0.839 ms
  2. Passing signals to a process with the kill command. Open another terminal, you can run these two commands here, -KILL equals 9.

    1
    2
    kill -9 pid
    kill -KILL pid

    In the previous terminal, the process will receive a SIGINT signal, and it will be killed immediately.

    1
    2
    3
    4
    5
    6
    7
    8
    9
    ➜  Magicefire ping -i 5 google.com
    PING google.com (172.217.12.46): 56 data bytes
    64 bytes from 172.217.12.46: icmp_seq=0 ttl=52 time=61.794 ms
    64 bytes from 172.217.12.46: icmp_seq=1 ttl=52 time=62.411 ms
    64 bytes from 172.217.12.46: icmp_seq=2 ttl=52 time=62.325 ms
    64 bytes from 172.217.12.46: icmp_seq=3 ttl=52 time=101.183 ms
    64 bytes from 172.217.12.46: icmp_seq=4 ttl=52 time=63.707 ms
    64 bytes from 172.217.12.46: icmp_seq=5 ttl=52 time=62.623 ms
    [1] 91977 killed ping -i 5 google.com

    You can also stop it with these arguments:

    1
    2
    kill -15 pid
    kill -TERM pid

    -TERM equals 15 here.

    The process will receive a SIGSTP, it will be terminated by the system.

    1
    2
    3
    4
    5
    6
    ➜  Magicefire ping -i 5 google.com
    PING google.com (172.217.1.142): 56 data bytes
    64 bytes from 172.217.1.142: icmp_seq=0 ttl=52 time=62.230 ms
    64 bytes from 172.217.1.142: icmp_seq=1 ttl=52 time=63.578 ms
    64 bytes from 172.217.1.142: icmp_seq=2 ttl=52 time=64.368 ms
    [1] 92134 terminated ping -i 5 google.com
  3. Closing the terminal
    Because the process is tied with the terminal instance that started it, when the terminal is closed, it will send a SIGUP signal to all of the processes tied to it.

The Solution

Now we have a process running in the foreground, we need to keep it running when we close the therminal. Before we close the terminal, we will take seveval steps to change it status, so it will not be stopped by ourselves.

  1. Ctrl-Z → send a SIGSTP signal to the process, and push the process back into the backgroud(job), then the process will be stopped.

    1
    2
    3
    4
    5
    6
    7
    8
    ➜  Magicefire ping -i 5 google.com
    PING google.com (172.217.6.174): 56 data bytes
    64 bytes from 172.217.6.174: icmp_seq=0 ttl=52 time=63.851 ms
    64 bytes from 172.217.6.174: icmp_seq=1 ttl=52 time=64.006 ms
    64 bytes from 172.217.6.174: icmp_seq=2 ttl=52 time=64.434 ms
    64 bytes from 172.217.6.174: icmp_seq=3 ttl=52 time=64.592 ms
    ^Z
    [1] + 92544 suspended ping -i 5 google.com
    1
    2
    ➜  Magicefire jobs
    [1] + suspended ping -i 5 google.com
  2. bg → resume the process in the background again.

    1
    2
    3
    4
    5
    6
    7
    ➜  Magicefire bg
    [1] + 92544 continued ping -i 5 google.com
    ➜ Magicefire 64 bytes from 172.217.6.174: icmp_seq=4 ttl=52 time=63.830 ms

    ➜ Magicefire jobs64 bytes from 172.217.6.174: icmp_seq=5 ttl=52 time=64.827 ms

    [1] + running ping -i 5 google.com
  3. You can type jobs to check the job and get its job number.

  4. disown %jobNUmber -> detach the job from the terminal

    1
    disown %1

The command disown will immune the SIGUP signal.
Now we can close the terminal safely.

When we back, we can use the command top, ps aux, or pgrep -a name, to get the PID of the process that we detached from the closed terminal. But now the only thing we can do is killing it:(. So if you want to monitor the status of this process, you’d better to redirect its output into a file.

1
ping -i 5 google.com > ping.out

Using nohup

If you know when starting the process that you will want to close the terminal before the process completes, you can start it using the nohup command.

1
nohup ping -i 5 google.com > ping.out &

Cheat Sheet Diagram

References

How To Use ps, kill, and nice to Manage Processes in Linux

How To Use Bash’s Job Control to Manage Foreground and Background Processes

Setup Webpack from Scratch

Posted on 2018-12-31 | Edited on 2019-01-02 | In Nodejs

What is the difference between __dirname and ./ in Nodejs

Three different situations need to be considered.

  1. In Nodejs, __dirname and __filename are always the directories in which these scripts reside.
  2. By contrast, ./ and ../ are the directories from which you run these scripts in Nodejs environment when you use libraries like path and fs.
  3. The paths in require are alway relative to these files.
    FOr more detail information, here is the reference link on Stackoverflow.

I give an example below, our directory is like this:

1
2
3
4
5
6
webpack-learning/src
├── app
└── server
├── index.js
└── utils
└── pathtest.js

and the server/utils/pathtest.js contains

1
2
3
4
5
6
7
8
9
10
11
12
13
14
const chalk = require('chalk')

const path = require('path')
const fs = require('fs')

module.exports = function () {
console.log(chalk.yellow('__filename = %s \n__dirname = %s', __filename, path.resolve(__dirname)))
console.log(chalk.yellow('. = %s', path.resolve('.')))

console.log(require('../../../assets/media/config.json'))
console.log(chalk.yellow(fs.readFileSync(path.resolve(__dirname, '../../../assets/media/sometext.txt'), 'utf8')))
console.log(chalk.red.bgYellow('the next readFileSync() will throw out an exception if the working directory is not on the top of src!'))
console.log(chalk.red.bgYellow(fs.readFileSync('./assets/media/sometext.txt', 'utf8')))
}

the server/index.js is

1
require('./utils/pathtest')()

When we run the script in the parent directory of src,

1
➜  webpack-learning git:(testpath) node src/server/index.js

we get this result in the console.

1
2
3
4
5
6
7
__filename = %s
__dirname = %s /Users/qinqubo/Magicefire/Playground/webpack-learning/src/server/utils/pathtest.js /Users/qinqubo/Magicefire/Playground/webpack-learning/src/server/utils
. = %s /Users/qinqubo/Magicefire/Playground/webpack-learning
{ hello: 'world' }
some txt
the next readFileSync() will throw out an exception if the working directory is not on the top of src!
some txt

If we run this script in other directory, the second readFileSync function call will throw out an error in the console like this,

1
2
3
4
5
6
7
8
9
10
11
12
13
14
15
16
17
18
...
some txt
the next readFileSync() will throw out an exception if the working directory is not on the top of src!
fs.js:646
return binding.open(pathModule._makeLong(path), stringToFlags(flags), mode);
^

Error: ENOENT: no such file or directory, open './assets/media/sometext.txt'
at Object.fs.openSync (fs.js:646:18)
at Object.fs.readFileSync (fs.js:551:33)
at module.exports (/Users/qinqubo/Magicefire/Playground/webpack-learning/src/server/utils/pathtest.js:13:37)
at Object.<anonymous> (/Users/qinqubo/Magicefire/Playground/webpack-learning/src/server/index.js:1:90)
at Module._compile (module.js:652:30)
at Object.Module._extensions..js (module.js:663:10)
at Module.load (module.js:565:32)
at tryModuleLoad (module.js:505:12)
at Function.Module._load (module.js:497:3)
at Function.Module.runMain (module.js:693:10)

You can examine the differences between the two readFileSync function calls. Because the second one use ../ as its path, and these ./ and ../ are depended on the directory where you run the script. So the second one got an error.

I pushed the example code on Github, you can check out on the test-path branch.

The Paths in the webpack.config.js

Common Options

The Webpack is a compiler which reads a file specified by config.entry and recursively builds a dependency graph and then packages all these artifacts into a group of bundles(or a single bundle).

So a bunch of options of config in the webpack.config.js are about how to find the the input files in our project folder, and the others are used to figure out where the Webpack keep the output files. Some of these properties give absolute paths, some of them are relative to other options.

The table below gives some examples about the input options

name role default value dependency
context The base directory, an absolute path, for resolving entry points and loaders from configuration. The default value is process.cwd() but it’s recommended to replace it with an absolute address context: path.resolve(__dirname, 'app')
entry The point or points to enter the application context If entry is an absolute address, the context will be ignored
template(html-webpack-plugin) require path to the template. ‘’ context

When we discuss the output, we need to seperate 2 different situations. If we just let the Webpack package the bundle for us, then the Webpack create all output files on the disk. But
when we use the webpack-dev-server, the web server will mount these output files in the memory. The options are somewhat different.

Now we use webpack webpack --config ./build/webpack.config.js to create a distribute folder, here is the options we need to specify.

name role default value dependency
output.path The output directory as an absolute path.
output.filename This option determines the name of each output bundle. The bundle is written to the directory specified by the output.path option
outputPath(file-loader) output.path
filename(HtmlWebpackPlugin) output.path

When we start the webpack-dev-server, some of the options are different.

name role default value dependency
devServer.publicPath Its role is same as the role of output.path. The differency is that it is mounted in the memory and as part of URL address which only be accessed from a web browser through the express server. ‘/‘
devServer.contentBase Tell the server where to serve content from. This is only necessary if you want to serve static files. devServer.publicPath will be used to determine where the bundles should be served from, and takes precedence. I think this option is useless and confused. Maybe when some resources are not packaged into our bundle, but can be accessed under the run time. In this case, maybe we would use this option.

The Most Confused Part, publicPath

The most confused parts in the config of the Webpack are the two publicPaths. One is the devServer.publicPath we mention it before. The other is the output.publicPath. The latter in most case is a placeholder used by loaders and/or plugins to prefix(update) the URLs in the modules. In the production mode, we usually use this option to specify the CDN address, so we don’t need to manually update the URLs in all the files to point to the CDN.

1
2
3
4
5
6
7
8
9
10
11
12
module.exports = {
//...
output: {
// One of the below
publicPath: 'https://cdn.example.com/assets/', // CDN (always HTTPS)
publicPath: '//cdn.example.com/assets/', // CDN (same protocol)
publicPath: '/assets/', // server-relative
publicPath: 'assets/', // relative to HTML page
publicPath: '../assets/', // relative to HTML page
publicPath: '', // relative to HTML page (same directory)
}
}

But, here is alway a But. When the output.publicPath is not a CDN address, it will influence the output result when we start the webpack-dev-server. I’m really bad at googling staff, I tried to find some articles, but they didn’t meet my expectations. And the document of Webpack is also terrible.

There are common mistakes we usually meet.

  1. If we assign the values for devServer.publicPath and output.publicPath, but the values are different. The html cabn be loaded successfully, but the bundle and the other resource can not be accessed.
    1
    2
    3
    4
    5
    6
    7
    8
    9
    10
    11
    12
    13
    14
    15
    16
    17
    const config = {
    output: {
    publicPath: '/notdist/',

    path: path.resolve(__dirname, '../dist'),
    filename: '[name].bundle.js'
    },
    ...
    devServer: {
    // static files served from here
    publicPath: '/dist/',

    port: 2000,
    stats: 'errors-only',
    open: true
    },
    }

  1. If both of these publicPaths are not given values, the default value of the devServer.publicPath is ‘/‘, and the default value of the output.publicPath is ‘’. That will be ok. But if we assigned a value to the output.publicPath, but didn’t give a value to the devServer.publicPath, the devServer.publicPath will use the output.publicPath value!
    1
    2
    3
    4
    5
    6
    7
    8
    9
    10
    11
    12
    13
    14
    15
    16
    17
    const config = {
    output: {
    publicPath: '/dist/',

    path: path.resolve(__dirname, '../dist'),
    filename: '[name].bundle.js'
    },
    ...
    devServer: {
    // static files served from here
    // publicPath: '/dist/',

    port: 2000,
    stats: 'errors-only',
    open: true
    },
    }
1
2
3
4
5
6
7
> NODE_ENV=development webpack-dev-server --config ./build/webpack.config.js

clean-webpack-plugin: /Users/qinqubo/Magicefire/Playground/webpack-learning/dist has been removed.
ℹ 「wds」: Project is running at http://localhost:2000/
ℹ 「wds」: webpack output is served from /dist/
⚠ 「wdm」:
ℹ 「wdm」: Compiled with warnings.


It is not an error, but it is very confused:(

  1. The example before, we start the output.publicPath with the ‘/‘, so it is a server-relative path. So far everything is fine. But if we set this option using an address which is relative to HTML page, like ‘dist/‘
    1
    2
    3
    4
    5
    6
    7
    8
    9
    10
    11
    12
    13
    14
    15
    16
    17
    const config = {
    output: {
    publicPath: 'dist/',

    path: path.resolve(__dirname, '../dist'),
    filename: '[name].bundle.js'
    },
    ...
    devServer: {
    // static files served from here
    // publicPath: '/dist/',
    // open app in localhost:2000
    port: 2000,
    stats: 'errors-only',
    open: true
    },
    }
1
2
3
4
5
6
7
8
> NODE_ENV=development webpack-dev-server --config ./build/webpack.config.js

clean-webpack-plugin: /Users/qinqubo/Magicefire/Playground/webpack-learning/dist has been removed.
ℹ 「wds」: Project is running at http://localhost:2000/
ℹ 「wds」: webpack output is served from /dist/
ℹ 「wdm」: wait until bundle finished: /dist/index.html
⚠ 「wdm」:
ℹ 「wdm」: Compiled with warnings.

loaders and plugins will update URLs with the html-relative path, here is the ‘dist/‘, but webpack output is served from ‘/dist/‘, we can access the html file at http://localhost:2000/dist/index.html, The linkers in this html file are pointing to the wrong addresses, such as src="dist/assets/media/webpacklogo.png" or src="dist/app.bundle.js" It is a relative path to the html file, but the html file and the bundle filea are already in the dist, and there is no sub-folder called dist

It is a disaster. My suggestion is avoiding using the derServer.publicPath and not using output.publicPath under the development mode. The only purpose of the output.publicPath is setting CDN address under the production mode.

1
2
3
4
5
6
7
8
9
10
11
12
13
14
const env = process.env.NODE_ENV      

const config = {
...

output: {
// absolute path declaration
publicPath: env === 'development' ? '' : 'https://cdn.example.com/assets/',
path: path.resolve(__dirname, '../dist'),
filename: '[name].bundle.js'
},

...
}

The path of CleanWebpackPlugin

If we use CleanWebpackPlugin to remove the ‘dist’ folder, we must set the root value in its options when the config file is not in the root of the project.

1
2
3
4
5
plugins: [
// cleaning up only 'dist' folder
new CleanWebpackPlugin(['dist'], {
root: path.resolve(__dirname, '../'),
}),

You can check out on the test-publicpath branch on Github.

From MVC to MVVM-C, Step by Step, Part I

Posted on 2018-08-23 | Edited on 2018-09-26 | In Software Architecture

Table of Contents

Preface

In this article, I will share my experience how to refactor the codebase from MVC to MVVM-C. I will start with a simple example application, and do the refactoring step by step slowly to show you every key points of architecture pattern in iOS development.

Introduction of the Demo application

I will create an application which is cloned from some applications about cryptocurrency market on Appstore. The application doesn’t touch any buying or selling actions, it just show the marketing data from Open APIs, so you don’t worry about your wallet :)

It is a very simple example, including only four main pages.

The “Prices” show the current marketing prices, you can input the name of cryptocurrency which you interested in to filter the table list, and you can also sort the order by click the name, price and change label on the section header.

Swipe the table items in the price list, you can save these items into your favorite list. In the “My Favorites”, you can swipe the item to remove it from your favorite list.


Click the item in the Price list, the item will be expanded to show a kline diagram.

At the right cover of the price page, there is a setting button which will pop a setting page to let you choice the data source of the kline. You have two options, one is from Huobi, the other is from Crypto Compare. You can also click the switch to save your favorites then they will be reloaded when you open the application next time.

That’s all. Though it is an really simple example, it still cover lots of knowledges in iOS development. But this article only focuses on some topics listed below:

  1. the architecture patterns:

    From MVC, MVVM, MVVM+RxSwift to MVVM+RxSwift+Coordinator, so many acronyms, which architecture is the best? I think that none of them is the “Best” one. There is “No Silver Bullet”. Each one can suit better a specific scenario. But we must follow some principles. In this article, I will share my experience and list the pros and the cons of each pattern, and talk about how to make choice when I design an application.
  2. how to implement the user interface:

    The first thing in writing an application is implementing the user interface. But sometime we need essential data to help us to design the UI. Where these data come from? Do we need to write the networking layer first and fetch data from the backend? Or just grab some data through branch of http requests and save these data as an asset file in JSON format?


    But there is another good idea that we can use some data mock platforms to generate these data automatically.
    • Mockaroo

    • Easy Mock(大搜车)


      This is also an open source solution, you can build your own data mock platform on your computer.
  3. how to build a networking layer

    After we finish our UI design, we must create service modules to connect the real world to get the data and present these data onto our UI components. If you are lazy, you can import a third party solution, the popular one is Alamofire. It is very easy to use and very powerful. But in this article I will build my networking layer from scratch. You can reference this paper Writing a Network Layer in Swift: Protocol-Oriented Approach. Malcolm Kumwenda is a good guy to help you create you own networking layer step by step.


    Why do I need to write networking layer by myself? One principle is we must implement the core module by ourselves and if these module are not very difficult to implement. Be careful to depend on a third party source, particularly when lots of other modules depend on it. You will take high risk to rely on these third party solutions.
  4. how to test your modules.

    The deliver quality is based on how we dedicate on testing. And all outputs of refactoring the architecture are let us more easy to test our code. ViewModel separated from ViewController is more helpful to test the business logic and the presentational logic.
  5. immigrate from procedural programming to functional Reactive Programming

    Immigrating from procedural programming to declarative programming is just like people who immigrate to a new country where the language is totally different.
    the life is hard, but it is still going on. If you estimate that the business logic and the state of your application will become more complicated as time goes by.

The functional programming paradigm was explicitly created to support a pure functional approach to problem solving. Functional programming is a form of declarative programming. In contrast, most mainstream languages, including object-oriented programming (OOP) languages such as C#, C++, and Java, were designed to primarily support imperative (procedural) programming.

Design Our UI

Understanding how and when a view updates requires a deeper understanding of the UIKit framework. This article focuses on the architecture patterns, so we will not talk more about the UI staffs. But the topics I discuss below are very important to you to build an application as quickly as possible.

Storyboard or Programmatic is a problem

Here is the whole picture of our pages in the storyboard.

There are still lots of debates about whether to use storyboard or write UI programmatically. You can find a lot of articles to summarize the pros and cons on both sides(Why I Don’t Use Storyboard and Storyboard vs Programmatically in Swift). These are guidelines when I need to make a choice at the crossroads.

Storyboard Programmatic
Ease to use Reusability
Visualization Merge Conflict

In a big project, the choice is depended on your team and the consensus made in your team. I prefer using storyboard to create static view objects and doing it programmatically when I create visual objects dynamically.

When I teach, I don’t wanna make my audience fall asleep. So, why not make it a little more interesting since seeing is believing.🤔

Because this is a demo application, and the UI is very simple, so using storyboard is good choice.

How many view controllers do we need?

UX/UI designer create the wireframes by using Sketch. Sometimes we just map the pages in the sketch file to view controllers, they are almost one-on-one mapping. But be careful! Before apply other architecture paradigm, we start from MVC, and view controllers in MVC mode are so heavy, so discuss the features with your UX/UI designers or product designers first if you don’t want to mess up. Sometimes we must separate some of features in one page and move them into other view controllers. These view controllers are embedded in the “host” view controller as child view controllers. In our demo application, when we click on the item in the tableview, the cell will be expanded and show the kline of selected cryptocurrency, the expanded view in the cell view need a child view controller to coordinate the kline data service and the view who show the kline. So I dynamically create a view controller named “ExpandViewcontroller” as a child view controller embedded in “CoinListViewController”.

Expand the cell view and add the “ExpandViewcontroller” as a child view controller,

1
2
3
4
5
6
7
8
9
10
11
12
13
14
15
expandViewController = UIStoryboard(name: "Main", bundle: nil).instantiateViewController(withIdentifier: "ExpandViewController") as! ExpandViewController

self.addChildViewController(expandViewController)
cell.expandView.addSubview(expandViewController.view)

expandViewController.view.translatesAutoresizingMaskIntoConstraints = false

NSLayoutConstraint.activate([
expandViewController.view.leadingAnchor.constraint(equalTo: cell.expandView.leadingAnchor),
expandViewController.view.trailingAnchor.constraint(equalTo: cell.expandView.trailingAnchor),
expandViewController.view.topAnchor.constraint(equalTo: cell.expandView.topAnchor),
expandViewController.view.bottomAnchor.constraint(equalTo: cell.expandView.bottomAnchor)
])

expandViewController.didMove(toParentViewController: self)

Fold the cell view when we click the cell again,

1
2
3
expandViewController?.view.removeFromSuperview()
expandViewController?.removeFromParentViewController()
expandViewController = nil

AutoLayout and constraint

Being familiar with UIKit is very important for developing your user interface. And you must be prepare to move beyond the basics, and dive into the UI framework. When you do start writing iOS apps, you’ll have a solid and rigorous
understanding of what you are doing and where you are heading.

There are three stages before views can be displayed on the screen. The first step is “updating constrains”, which is form subviews to their superviews(bottom-up). It will prepare the information needed for the second step called “layout”. In this step, frames(centers and bounds) of views will be set depending on the constrain system. Finally the “display” pass renders the views on the screen.

Before you take control of layout, you need to know how to trigger the override functions in these three steps, and when to trigger these functions. The table below lists all relative functions in these steps.

Method purposes Constraints Layout Display
Implement updates (override, don’t call explicitly) updateConstraints layoutSubviews draw
Explicitly mark view as needing update on next update cycle setNeedsUpdateConstraints invalidateIntrinsicContentSize setNeedsLayout setNeedsDisplay
Update immediately if view is marked as “dirty” updateConstraintsIfNeeded layoutIfNeeded
Actions that implicitly cause views to be updated Activate/deactivate constraints
Change constraint’s value or priority
Remove view from view hierarchy
addSubview
Resizing a view setFrame that changes a view’s bounds (not just a translation)
User scrolls a UIScrollView
User rotates device
Changes in a view’s bounds
A good example of changing the local constraints
1
2
3
4
5
6
7
8
9
10
11
12
13
14
15
16
17
18
19
20
21
22
23
24
25
26
27
28
// Create a new property to hold the aspect ratio constraint of an imageView
fileprivate var aspectRatioConstraint:NSLayoutConstraint?

// Override the updateConstraints function to recreate the aspect ratio constraint depending on the image width and height
override func updateConstraints() {
super.updateConstraints()

var aspectRatio: CGFloat = 1
if let image = image {
aspectRatio = image.size.width / image.size.height
}

// setting the isActive of a constraint to false will make this constraint be nil, so you need to create a new one
aspectRatioConstraint?.isActive = false
aspectRatioConstraint =
imageView.widthAnchor.constraint(
equalTo: imageView.heightAnchor,
multiplier: aspectRatio)
aspectRatioConstraint?.isActive = true
}

// Change the image property declaration in order to invalidate the constraints and trigger the autolayout process again:
var image: UIImage? {
didSet {
imageView.image = image
setNeedsUpdateConstraints()
}
}
Change constraints with animations

If you want to replace the default behaviors of constraints animation, you must call the layoutIfNeeded function in the animation block, otherwise the change of the constraint will be executed in the update cycle of the run loop, so the animation block you defined will be useless.

1
2
3
4
5
6
7
8
9
10
11
12
13
func collapseHeader() {
UIView.animate(withDuration: 1.2, animations: {
self.headerHeightConstraint.constant = self.minHeaderHeight
self.view.layoutIfNeeded()
})
}

func expandHeader() {
UIView.animate(withDuration: 0.2, animations: {
self.headerHeightConstraint.constant = self.maxHeaderHeight
self.view.layoutIfNeeded()
})
}

In the updateConstraints() function, you can’t invalidate any constraints, otherwise you will get a crash because your program has already been in the layout cycle.


You can change the properties which are relative with the constraints, then invalidate constraints and trigger the layout process in the event process stage of the main run loop, then the system will call the callback function updateConstraints you override in the update cycle . In this function, you can change/remove/add constraints which depending on the properties changing before. This guideline can also apply to the process of layout and display.

There are some scenarios about how to fine-tune the frames of your views by overriding the layoutSubviews function. The first one is not necessary, because you can add a constraint, but it is an example.

1
2
3
4
5
6
7
8
9
10
11
12
13
14
15
- layoutSubviews
{
[super layoutSubviews];
if (self.subviews[0].frame.size.width <= MINIMUM_WIDTH) {
[self removeSubviewConstraints];
self.layoutRows += 1;
[super layoutSubviews];
}
}

- updateConstraints
{
// add constraints depended on self.layoutRows...
[super updateConstraints];
}

There is a trick. Because the layout process is top-down, you can get the frame of the current view before you call the super function layoutSubviews. After the super function layoutSubviews being called, the subviews of this view also get their frames, so you can get the sizes and positions of its’ subviews. In this case, we compare the width of the first subview, and change the layoutRows property, then call its’ super layoutSubviews to fire the autolayout process from the updating constraints step again.

You can also subclass your first subview(in this case), and override the layoutSubviews function in its’ subclass, and get its’ frame like the next example which fine-tune the width of a multi-line label

1
2
3
4
5
6
7
@implementation MyLabel
- (void)layoutSubviews
{
self.preferredMaxLayoutWidth = self.frame.size.width;
[super layoutSubviews];
}
@end

Or you can make this adjustment at the view controller level, put this logic into the viewDidLayoutSubviews function. Because the autolayout process is finished, so you must re-fire this process by calling layoutIfNeeded

1
2
3
4
5
6
- (void)viewDidLayoutSubviews
{
[super viewDidLayoutSubviews];
myLabel.preferredMaxLayoutWidth = myLabel.frame.size.width;
[self.view layoutIfNeeded];
}
StackView with Fill Distribution

Core Animation’s models, classes and blocks

Animation in iOS is huge topic, but the animation process can be as simple as changing properties during a given time. It includes two main animation systems. One is based on “View Animation”, and the other is called “Core Animation”. I only list some key issues about Animation.

View Animation

There are three stages for “View Animation” because of the historical evolution of iOS. I just give some snippet codes below for each of these stages.

  • Begin and commit

    1
    2
    3
    4
    UIView.beginAnimations(nil, context: nil)
    UIView.setAnimationDuration(1)
    self.v.backgroundColor = .red
    UIView.commitAnimations()
  • Block-based animation

    1
    2
    3
    UIView.animate(withDuration:1) {
    self.v.backgroundColor = .red
    }
  • Property animator

    1
    2
    3
    4
    let anim = UIViewPropertyAnimator(duration: 1, curve: .linear) {
    self.v.backgroundColor = .red
    }
    anim.startAnimation()
Implicit Layer Animation

Before we jump to “Core Animation”, we also can change properties on CALayer. It is called “Implicit Layer Animation”. Just set layer properties, and your layers animate in the default way. You can not control the animation except you use a “CATransaction” with “Implicit Layer Animation”. And remember, there is always an implicit transaction surrounding your code, and you can operate on this implicit transaction without any begin and commit.

1
2
3
4
5
6
7
8
// can be omitted
CATransaction.begin()

CATransaction.setAnimationDuration(0.8)
self.globalLabel.layer.transform = CATransform3DMakeRotation(0, 1, 0, 0)

// can be omitted
CATransaction.commit()
Core Animation

“Core Animation” is also called “Explicit Layer Animation”. To specify a property using a keyPath, we can create an CABasicAnimation object or its inheritance, then we add this object onto the layer of a view. There are two problems when we use “Core Animation”. One is setting a property on a layer will fire the “Implicit Layer Animation”, We can prevent this side effect by disabling actions:

1
2
3
4
5
6
7
8
9
10
11
12
13
14
15
16
17
CATransaction.begin()
CATransaction.setDisableActions(true)

let transformAnimation = CABasicAnimation(keyPath: #keyPath(CALayer.transform))
transformAnimation.fromValue = CATransform3DMakeRotation(0, 1, 0, 0)
transformAnimation.toValue = CATransform3DMakeRotation(CGFloat(Double.pi), 1, 0, 0)
transformAnimation.duration = 2
transformAnimation.autoreverses = true
transformAnimation.repeatCount = .infinity

CATransaction.setCompletionBlock({
self.globalLabel.layer.transform = CATransform3DMakeRotation(0, 1, 0, 0)
})

self.globalLabel.layer.add(transformAnimation, forKey: #keyPath(CALayer.transform))

CATransaction.commit()

The other problem is if we use “Core Animation”, the property will not change to the value when the animation is end, because “Core Animation” create a new layer to present the animation, called “presentation layer”. So we need it set the new value into the property of its “model layer” in the completion block.

If you use “Implicit Layer Animation” or “View Animation”, you don’t need to care about these problems, because the Animation framework will handle these for you. But when you use the “Core Animation” which is the fundamental underlying iOS animation technology, you get more powerful, so you need more responsibility.

Transitions

Another concept called “Transitions” is very confused, if you are not a native English speaker. Usually we use “Transitions” in two situations. We can change the content of a view such as the image of a UIImageView using “transition(with:duration:options:animations:completion:)” function:

1
2
3
4
let opts : UIViewAnimationOptions = .transitionFlipFromLeft
UIView.transition(with:self.iv, duration: 0.8, options: opts, animations: {
self.iv.image = UIImage(named:"Smiley")
})

Or we can replace the first view with the second view by using “transition(from:to:duration:options:completion:)” function.

1
2
3
4
5
6
7
  let lab2 = UILabel(frame:self.lab.frame)
lab2.text = self.lab.text == "Hello" ? "Howdy" : "Hello"
lab2.sizeToFit()
UIView.transition(from:self.lab, to: lab2,
duration: 0.8, options: .transitionFlipFromLeft) { _ in
self.lab = lab2
}

Custom UIViewController Transitions

The transitioning API includes several components which conform a collection of protocols. The diagram below shows these relative components:


Here is the 7 steps involved in a presentation transition:

  1. Before You trigger the transition either programmatically or via a segue, you need to set the transitioningDelegate property in your “to” view controller. In this case, the transitioningDelegate is the “from” view controller. The “from” view controller in here is also the presenting view controller. When you trigger the transition via a segue, the override function prepare(for:)_ in the presenting view controller will be called, in this function, you can get the “to” view controller(also called “ presented “) form the segue destination. Then you can set the transitioningDelegate property of the destination to itself.

    1
    2
    3
    4
    5
    6
    7
    8
    9
    override func prepare(for segue: UIStoryboardSegue, sender: Any?) {
    super.prepare(for: segue, sender: sender)
    segue.destination.transitioningDelegate = self

    if let navigationController = segue.destination as? SettingsNavigationController,
    let settingsViewController = navigationController.viewControllers.first as? SettingsViewController {
    settingsViewController.delegate = self
    }
    }
  2. UIKit asks the “presented” view controller (the view controller to be shown) for its transitioning delegate. If it doesn’t have one, UIKIt uses the standard, built-in transition. In here the delegate is the presenting view controller. The transition delegate conforms two methods of UIViewControllerTransitioningDelegate protocol . One is for presenting, the other is for dismissing.

  3. UIKit then asks the transitioning delegate for an animation controller via animationController(forPresented:presenting:source:). If this returns nil, the transition will use the default animation. The transition delegate create and return an animation controller who confirms the UIViewControllerAnimatedTransitioning protocol
  4. UIKit constructs the transitioning context. Be careful, if you want to see the presenting view controller behind the presented view controller, you need to set the presentation style to .overFullScreen or .overCurrentContext. If you set this property to .fullScreen, the view of the presenting view controller will be replaced
  5. UIKit asks the animation controller for the duration of its animation by calling transitionDuration(using:).
  6. UIKit invokes animateTransition(using:) on the the animation controller to perform the animation for the transition.
  7. Finally, the animation controller calls completeTransition(_:) on the transitioning context to indicate that the animation is complete.

And the steps for a dismissing transition are nearly identical.
When you tigger the reserves process, UIKit asks the transitioning delegate for an animation controller animationController(forDismissed dismissed:), then repeat the steps from 4 to 7.

Here is the animation controller code who play the animation role:

1
2
3
4
5
6
7
8
9
10
11
12
13
14
15
16
17
18
19
20
21
22
23
24
25
26
27
28
29
30
31
32
class PresentTransitionController: NSObject, UIViewControllerAnimatedTransitioning {

func transitionDuration(using transitionContext: UIViewControllerContextTransitioning?) -> TimeInterval {
return 0.6
}

func animateTransition(using transitionContext: UIViewControllerContextTransitioning) {

let fromViewController = transitionContext.viewController(forKey: .from)!
let toViewController = transitionContext.viewController(forKey: .to)!
let containerView = transitionContext.containerView

let screenBounds = UIScreen.main.bounds
let topOffset: CGFloat = 160.0

var finalFrame = transitionContext.finalFrame(for: toViewController)
finalFrame.origin.y += topOffset
finalFrame.size.height -= topOffset

toViewController.view.frame = CGRect(x: 0.0, y: screenBounds.size.height,
width: finalFrame.size.width,
height: finalFrame.size.height)
containerView.addSubview(toViewController.view)

UIView.animate(withDuration: transitionDuration(using: transitionContext), delay: 0.0, usingSpringWithDamping: 0.8, initialSpringVelocity: 1.0, options: .curveEaseOut, animations: {
toViewController.view.frame = finalFrame
fromViewController.view.alpha = 0.3
}) { (finished) in
transitionContext.completeTransition(finished)
}
}
}

Add Gesture On the Section header

Connect with internet

We already have got the “Views” in MVC pattern, it is time to build the “Models” and create networking service to connect with our backend. There are lots of approaches to build the “Models” and networking service.

  1. The most formal way is introducing some mocks and stubs before creating real data models and connecting the endpoints. The frontend developing will not depend on the progress of the backend developing. As I mentioned before you can use the data mock platform to mock the data we need, some of these platform are open source. You can setup your own data mock platform on your laptop, and you also can use their online service to create data, then download and save to a JSON file as a resource embedded into your application bundle. The other benefit is you can use these mock data to test your business logics and application logics. You will not stuck in debugging with backend engineers and complain each other, and the testers who get theirs test sets can help you test your application and business logics.

  2. If the backend service is ready and stable. You can skip the step to build the mock data and stubs. Importing a third party module is also a good choice. Alamofire is one of the famous open sources. Using a heavy library sometimes you must be careful, if you don’t want to relay on this one.

  3. There are an assumption that building a networking framework is a big challenge. Implementing the basic feature I think is not difficult, you can reference this topic “Writing a Network Layer in Swift: Protocol-Oriented Approach
    “
    from Malcolm Kumwenda. This guy write a good article to teach you how to build your own networking layer step by step.

First I wrote a http request using the native API URLSession, extend each model with a JSON initializer, handle the nested objects. When I get the data from a http request, I map the JSON format into a corresponding object.

1
2
3
4
5
6
7
8
9
10
11
12
13
14
15
16
17
18
19
20
21
22
23
24
25
26
27
28
29
30
31
32
33
34
extension Ticket {
init?(from json: [String: Any]) {
guard
let id = json["id"] as? UInt,
let name = json["name"] as? String,
let symbol = json["symbol"] as? String,
let website_slug = json["website_slug"] as? String,
let rank = json["rank"] as? UInt,
let circulating_supply = json["circulating_supply"] as? Double,
let total_supply = json["total_supply"] as? Double,
let max_supply = json["max_supply"] as? Double,
let quotesDict = json["quotes"] as? [String: Any],
let last_updated = json["last_updated"] as? UInt64
else {
return nil
}

self.init(id: id,
name: name,
symbol: symbol,
website_slug: website_slug,
rank: rank,
circulating_supply: circulating_supply,
total_supply: total_supply,
max_supply: max_supply,
quotes: Dictionary(uniqueKeysWithValues:
quotesDict.map { key, value in
let (key, value) = (key, QUOTE(from: (value as? [String: Any])!))
return (key, value!)
}
),
last_updated: last_updated)
}
}
1
2
3
4
5
6
7
8
9
10
11
12
13
14
15
16
17
18
19
20
21
22
23
24
let url = URL(string: "https://api.coinmarketcap.com/v2/ticker/")!

session.dataTask(with: url) { (data, response, error) in
DispatchQueue.main.async {
if let error = error {
completionHandler(.error(error))
return
}

guard
let data = data,
let jsonObject = try? JSONSerialization.jsonObject(with: data, options: []),
let jsonDict = jsonObject as? [String: Any],
let dataDict = jsonDict["data"] as? [String: Any]
else {
completionHandler(.error(ServiceError.cannotParse))
return
}

let items = dataDict.values.map{ $0 } as? [[String: Any]]
let tickets = items!.compactMap(Ticket.init)
completionHandler(.success(tickets))
}
}.resume()

It is not a bad idea, if you write a simple example, but it will turn to a disaster quickly when you write a real application. But I don’t want to use the Alamofire right now. So I followed Malcolm Kumwenda to create my own networking library, base on his codebase, I make a little change to support multi data sources.

The diagram is showed below, there three main roles in this diagram

  1. Different endpoints in every data source are defined in different enums(Huobi API, CoinMarketAPI and CryptoCompareAPI), these enums all conform EndPointType protocol, you can get http parameters, paths and methods from these variables in this protocol, the return values depend on the values of the enums.

  2. Router is a generic class. Giving different EndPoints, we can create different routers. The responsibility of this Router is prepare the parameters depending on the given endpoints, then trigger the real url sessions.

  3. Our application involve three websites: Huobi, CoinMarket and CryptoCompare. So we create three NetworkManagers for each site. These NetworkManagers are all singleton, creating a router using an endpoint to replace the placeholder is their only jobs, then inject this router into themselves. These NetworkManagers all inherit form NetworkManager who handle the errors during the networking requests, and parse the JSON result form backend. It aslo managers all tasks created by the router. You can cancel these tasks by unique id.

  4. NetworkEnvironment is a singleton class which distinguishs different running environment:

    1
    2
    3
    4
    5
    enum NetworkEnvironment {
    case qa
    case product
    case staging
    }

In Swift 4 they provide Decodable protocol, I use this to convert my JSON objects to an equivalent Struct or Class. Sometimes you don’t need to write a single line, but if the names of the properties in our Classes are different from the keys returning from backend, we need to build the mapping.

1
2
3
4
5
6
7
8
9
10
11
12
13
14
15
16
17
18
19
20
21
22
23
24
25
//MARK: Listings
struct Item {
let id: UInt
let name: String
let symbol: String
let websiteSlug: String
}

extension Item: Decodable {
private enum ItemCodingKeys: String, CodingKey {
case id
case name
case symbol
case websiteSlug = "website_slug"
}

init(from decoder: Decoder) throws {
let itemContainer = try decoder.container(keyedBy: ItemCodingKeys.self)

id = try itemContainer.decode(UInt.self, forKey: .id)
name = try itemContainer.decode(String.self, forKey: .name)
symbol = try itemContainer.decode(String.self, forKey: .symbol)
websiteSlug = try itemContainer.decode(String.self, forKey: .websiteSlug)
}
}

The Bridge - Controllers

Now we have the two important elements “Views” and “Models” in MVC pattern. We will finish our business logics and application logics in our “Controllers” to connect our “Views” with our “Models”.

The main feature of this demo application is fetch data from three websites who provide real time exchange infos of cryptocurrencies, and show these data in a tableview. Thee is no business logic at the front end, and this application only contains some simple application logics:

  1. Filter the result got from the network by typing some keywords at the top of the tableview.
  2. Choice whether or not to list tokens by clicking a switch of selecting cryptocurrency type.
  3. Sort the list in a descending or ascending order by name or price or change rate.
  4. You can swipe the tableview item in the price view controller to add this cryptocurrency into your favorite list. You can also remove it from your favorite list. This favorite list will be saved, and will be reload when this application is being launched.
  5. When you click the item, the tableview cell will be expanded, and show the kline of the selected cryptocurrency in a chart.
  6. As a demo application, I add a feature that you can select different data sources of this kline in the setting view controller.
  7. It will pop a webview to present the detail information of the selected cryptocurrency, when you tap the “eye” on the right top of the expanded chart view.

Writing these application logics is not a big challenge. After I added a few lines of code, I can filter this list by some keywords and type. But when I was adding the sorting logic, I was aware that I had already messed around the view controllers.

1
2
3
let ticker = showCoinOnly ? (whichHeader == .coin ? sortTickers(_tickers.filter({ !$0.isToken }))[indexPath.row] : _tickers.filter({ !$0.isToken })[indexPath.row])
: (indexPath.section == 0 ? (whichHeader == .coin ? sortTickers(_tickers.filter({ !$0.isToken }))[indexPath.row] : _tickers.filter({ !$0.isToken })[indexPath.row])
: (whichHeader == .token ? sortTickers(_tickers.filter({ $0.isToken }))[indexPath.row] : _tickers.filter({ $0.isToken })[indexPath.row]))

But when I wanted to display the result on the tableview, Only three conditions I needed to apply on the result, this expression made me crazy, and I put this snippet in every place in the tableview controller. I realized that this code must be used and can be readable. All of the functions in the above code is filtering and sorting when some conditions is changed.


This diagram is more like some figures in reactive programming article, this is the main motivation why we need to change from functional programming paradigm to imperative mode. Let me finish the MVC part, because we still meet other problems. So I create an extension of Array where its element must be “Ticker”. Then I moved this logic into the “milter” function in this extension.

1
2
3
4
5
6
7
8
9
10
11
12
13
14
15
16
17
18
19
20
21
22
23
24
25
26
27
28
29
30
31
32
33
34
35
36
37
38
39
40
41
42
43
44
45
46
47
48
49
50
51
52
extension Array where Element == Ticker {
func filter(BySearch searchText: String?) -> [Ticker] {
var filterTickers = [Ticker]()
if let lowcasedSearchText = searchText?.lowercased() {
filterTickers = self.filter { $0.fullName.lowercased().range(of: lowcasedSearchText) != nil }
}
if filterTickers.count == 0 {
filterTickers = self
}
return filterTickers
}

func milter(filterBy searchText: String?, separatedBy section: Section, sortedBy condition: Sorting) -> [Ticker] {
var filterTickers = [Ticker]()
filterTickers = filter(BySearch: searchText)

filterTickers = filterTickers.filter {
switch section {
case .coin:
return !$0.isToken
case .token:
return $0.isToken
default:
return true
}
}

if condition == .none {
return filterTickers
}
filterTickers = filterTickers.sorted {
switch condition {
case .name:
return $0.fullName < $1.fullName
case .nameDesc:
return $0.fullName > $1.fullName
case .change:
return $0.quotes["USD"]!.percentChange24h < $1.quotes["USD"]!.percentChange24h
case .changeDesc:
return $0.quotes["USD"]!.percentChange24h > $1.quotes["USD"]!.percentChange24h
case .price:
return $0.quotes["USD"]!.price < $1.quotes["USD"]!.price
case .priceDesc:
return $0.quotes["USD"]!.price > $1.quotes["USD"]!.price
default:
return $0.fullName < $1.fullName
}
}

return filterTickers
}
}

In the tableview delegator or datasource, I replaced the old ones with

1
2
3
let _tickers = tickers.milter(filterBy: self.lowercasedSearchText,
separatedBy: Section(section: indexPath.section),
sortedBy: _sorted)

I cleaned my room, but the story wasn’t end. The sorting logic start from the user clicking on the section header. There are three section headers, one is for coin type, one is for tokens and the other is for my favorite list. And each of these section has three types of sorting. To keep this sorting statuses, I also introduced lots of “Variables” to present the status of sorting logic. These code snippet are scattering into several classes. If I didn’t check the code for some days and reviewed it again, I would almost forgot their relationship with the sorting logic.

The kline chart is embedded in the ExpandViewController, and the ExpandViewController is appeared in two view controllers, one is the price view controller, the other is the Favorite viewcontroller, so the ExpandViewController has two instances. And these instances have different life cycle. We change the kline datasource from the Setting view controller, this change can’t be conveyed to every one. There is no good method to cache this change, except using a global singleton object to store this status. That is why I created a class called “KLineSource”. Too many global object means disaster will come. But the MVC model, I have no choice, if I don’t want to keep this status in a lot of objects, and transfers this status from one object to the other one. It will be more uglily than the method before.

1
2
3
4
5
6
7
8
9
class KLineSource {
static let shared = KLineSource()

var dataSource = DataSource.cryptoCompare

private init() {

}
}

This is a simple demo application. So I only met these two main barriers. One is how to maintain relative statuses, and connect them effectively, some statuses are changed, some one will follow. Another is how to keep some statuses that we can access them convenience. I work around these issues, the codebase looks uglily now. And I have no idea how to test these code. So far I have finished the application under MVC pattern. You can check the code out here.

I think the MVVM pattern only brings us branch of new classes, if we don’t introduce the reactive framework. If we separate some logics from the massive view controllers, it will help us to test our application logic, but I am not sure about it is useful. Our real problem is how to synchronize these statuses distributed in different objects. The RxSwift give us a better solution to connect the statuses together. So I will jump to the MVVM w/ RxSwift in the next section.

MVC-RxSwift


When I separate our application into different objects with MVC pattern, we need some methods to exchange informations betwen these objects. In Apple’s framework, there are seveval ways we can choice, from delegates, callback blocks, notifications, KVO, to target/action event observers. It is convenient for us to glue these objects together. But it is also confused to us. Sometimes how to choice what kind of technology is a challenge. The big problem is we aslo need to connnect these different asynchronization methods in an appropriate way. In this process, we might create more additional varables to keep the status of the applcation.

It’s time to introduce the RxSwift. In RxSwift, an Obseravble can emit a sequences of event. And this event contains some kind of value. RxSwift also provide lots of operators to convert and combine these events whatever you want. The different kinds of Subjects are powerful tools we can use to bond these sequences to create reactive chains. When we subscribe these sequences, we will get the responses automatically.

Though RxSwift is a powerful tool, but it seems like a totally different language. We need to change our minds to master the new language. And the learning curve of Swift is higher than learning Swift as an Objective-C programmer. Swift and Objective-C are different dialects in a same language. But when we use RxSwift, we just like talking with Alias. There is no shortcut to master the new language. Just use try and use it.

How to encapsulate networking API using RxSwift

The first thing to me is encapsulating callback methods in networking API with RxSwift Observable. I added a new function called getDataFromEndPointRx to convert the callback into an Observable. And the Observable is a disposable object, I put the cancel logic in a callback function when the disposable object is created. So when the Obseravble object is released, It will cancel the http request automatically.

1
2
3
4
5
6
7
8
9
10
11
12
13
14
15
16
17
18
19
20
21
22
23
24
25
26
27
28
29
30
31
32
33
34
35
36
37
38
39
40
41
42
43
44
45
46
47
48
49
50
51
52
53
54
func getDataFromEndPointRx<T: Decodable>(_ endPoint: EndPoint,
type: T.Type) -> Observable<T> {
return Observable<T>.create({ observer in
let taskKey = self.getDataFromEndPoint(endPoint, type: type) {
(data, error) in
if error != nil {
observer.onError(error!)
return
}

if let _data = data as? T {
observer.onNext(_data)
}
}

return Disposables.create {
self.cancelRequestWithUniqueKey(taskKey)
self.tasks.removeValue(forKey: taskKey)
}
})
}

func getDataFromEndPoint<T: Decodable>(_ endPoint: EndPoint,
type: T.Type,
networkManagerCompletion: @escaping NetworkManagerCompletion) -> taskId {
let task = router.request(endPoint) { (data, response, error) in
DispatchQueue.main.async {
if error != nil {
networkManagerCompletion(nil, NetworkResponse.failed)
}
if let response = response as? HTTPURLResponse {
let result = self.handleNetworkResponse(response)
switch result {
case .success:
guard let responseData = data else {
networkManagerCompletion(nil, NetworkResponse.noData)
return
}
do {
let apiResponse = try JSONDecoder().decode(type.self, from: responseData)
networkManagerCompletion(apiResponse, nil)
} catch {
networkManagerCompletion(nil, NetworkResponse.unableTODecode)
}
default:
networkManagerCompletion(nil, result)
}
}
}
}
let taskId = NSUUID().uuidString
tasks = [taskId: task]
return taskId
}

In our application, we use Filesystem APIs to save our favorite cryptocurrencies. The Filesystem APIs are more like our networking APIs. We can use the same methodology to convert the Filesystem APIs into RxSwift Observables. But in this application, I didn’t do that, the main reason is our saved data is very small, and we can treat these APIs as synchronized function calls. So I think is not necessary for us to encapsulate them. I just subscrible the actions, and call these functions when the actions take place.

1
2
3
_selectRemoveMyFavorites.subscribe(onNext: {
self.removeSavedJSONFileFromDisk()
}).disposed(by: disposeBag)

How to handle the error events emmited from networking API, Materialize and Dematerialize

Our networking APIs have not the ability to handle the errors, they just conduct these errors from the bottom to the applcation layer. How to handle these errors is depended on uour application logic. Without RxSwift, every thing is ok. But when we convert the callback function into Observable onject, the chain will be broken, because I send the errors through the onError event. After the onError event is sent, the Observable object will be terminated, this is not we want, but we still want to get these error messages in the application layer. How can we get them? In RxSwift, they provide a mechanism called Materialize. It add a shell on the onError event, then this event turns into a normal event, and the error event become a value inside the normal event. Then we can use a filter operator to catch the error event when it happans. If it is not a error event, then the filter will dematerialize the event, we will get the original data again.

1
2
3
4
5
6
7
8
9
10
11
12
13
14
15
16
17
18
19
20
21
22
23
24
25
26
27
28
29
huobiReload.withLatestFrom(symbol.asObservable())
{ (dataSource, symbol) in
return symbol
}
.flatMap { (symbol) -> Observable<Event<KlineResponse>> in
return HuobiNetworkManager.shared.getDataFromEndPointRx(.historyKline(symbol: symbol.lowercased() + "usdt", period: "5min", size: 150), type: KlineResponse.self).materialize()
}
.filter { [unowned self ] in
guard $0.error == nil else {
Log.e("Catch Error: +\($0.error!)")
self.histoHourVolumes = Variable<[OHLCV]>([])
return false
}
return true
}
.dematerialize()
.map { (kLineResponse) -> [KlineItem] in
return kLineResponse.data
}
.map { (kLineItems) -> [OHLCV] in
var ohlcvs = [OHLCV]()
kLineItems.forEach({ (kLineItem) in
let ohlcv = OHLCV(time: 0, open: kLineItem.open!, close: kLineItem.close!, low: kLineItem.low!, high: kLineItem.high!, volumefrom: 0.0, volumeto: 0.0)
ohlcvs.append(ohlcv)
})
return ohlcvs
}
.bind(to: histoHourVolumes)
.disposed(by: disposeBag)

The Houbi API need me to provide correct symbol name, but I get the symbol name of cryptocurrency from CoinMarket. Sometimes the names of these symbols are not One-to-one correspondence. In this demo application, I don’t want to handle this situation, So i will get an error return from the Huobi API, when I switch from CryptoCompare to the Huobi API.

Use RxSwift Extensions: RxDataSource

Now we get the data, we can bind these data to views. RxCocoa has already encapsulated lots of controls in UIKit, but it is not enough when we encount some complex controls like TableView or CollectionView. At this situation, we need to use the extension framework from RxSwift community. RxDataSource makes us work more easy. First we create a datasource which is comfirmed SectionModelType protocol. This datasource also define a callback how to config tableview cell when we get the datasource item.

1
2
3
4
5
6
7
8
9
10
11
12
13
dataSource = RxTableViewSectionedReloadDataSource<SectionModel<String, Ticker>>(
configureCell: { dataSource, tableView, indexPath, item in
let cell = tableView.dequeueReusableCell(withIdentifier: self.cellIdentifier, for: indexPath) as! CurrencyCell
cell.selectionStyle = .none
cell.setCoinImage(item.imageUrl, with: (self.baseImageUrl)!)
cell.setName(item.fullName)
cell.setPrice((item.quotes["USD"]?.price)!)
cell.setChange((item.quotes["USD"]?.percentChange24h)!)
cell.setVolume24h((item.quotes["USD"]?.volume24h)!)

self.currentUrlString = (self.baseImageUrl)! + item.url

cell.setWithExpand(self.expandedIndexPaths.contains(indexPath))

After we get the data from Observable of the networking API, we map the event from the [Ticker] to [SectionModel<String, Ticker>], and bind this sections into the tableview. The RxDataSource solved our multi sections problem.

1
2
3
4
5
6
7
8
9
10
11
12
13
14
15
16
17
18
19
20
21
22
23
24
25
26
27
28
Observable.combineLatest(_coins, __tokens) {
return ($0, $1)
}
.map {
var sections = [SectionModel<String, Ticker>]()
if $0.count != 0 {
sections.append(SectionModel(model: "Coin", items: $0))
}
if $1.count != 0 {
sections.append(SectionModel(model: "Token", items: $1))
}

return sections
}
.bind(to: tableView.rx.items(dataSource: dataSource!))
.disposed(by: disposeBag)
```

But I can not find how to customize the section header view in different sections. The RxSwift keeps the delegate solution for some situation it can't handle. We can set a delegate to a tableview.rx, then the tableview still will call our delegate function in the view controller.

``` Swift
dataSource?.canEditRowAtIndexPath = { dataSource, indexPath in
return !self.expandedIndexPaths.contains(indexPath as IndexPath)
}

tableView.rx
.setDelegate(self)
.disposed(by: disposeBag)
1
2
3
4
5
6
7
8
9
10
11
12
13
14
15
16
17
18
19
20
21
22
23
24
25
26
27
28
29
30
31
32
33
34
35
extension PricesViewController {    
func tableView(_ tableView: UITableView, editActionsForRowAt indexPath: IndexPath) -> [UITableViewRowAction]? {
let favoriteRowAction = UITableViewRowAction(style: UITableViewRowAction.Style.default, title: "Favorite", handler:{ [weak self] action, indexpath in

guard let ticker = self?.dataSource?[indexPath] else {
return
}

self?.favoritesViewController.baseImageUrl = self?.baseImageUrl
self?.favoritesViewController.addTicker(ticker)
})

return [favoriteRowAction]
}

override func tableView(_ tableView: UITableView, viewForHeaderInSection section: Int) -> UIView? {
if section == 0 && self.coinSectionHeaderView == nil || section == 1 && self.tokenSectionHeaderView == nil {
if let headerView = super.tableView(tableView, viewForHeaderInSection: section) as? SectionHeaderView {
if section == 0 {
headerView.section = SortSection.coin
self.coinSectionHeaderView = headerView
} else {
headerView.section = SortSection.token
self.tokenSectionHeaderView = headerView
}
return headerView
}
return self.coinSectionHeaderView
} else if section == 0 {
return self.coinSectionHeaderView
} else {
return self.tokenSectionHeaderView
}
}
}

Connect all Observables and Observers together

Distinguishing from the MVC pattern, we connect all of the Observables and Observers together and gather all application logics like filtering, sorting and separating, etc in one place. I drew a whole diagram of these logics to show how different it is between using RxSwift and the MVC model.

In same cases, I use filter operator to activate different path in the reactive chain. And using withLatestFrom operator to tigger one event by the other event. Changing Kline datasource is an event emitted from a segment control in the Setting ViewController, and showing the Kline need another event which is changing the symbol name. The changing datasource event will trigger the changing symbol name event.


Interaction between view controllers from delegate to obserable and observer

After I established the reactive chains to replace the delegates in the view controllers, I deleted some of properties who refer to the data models in the Price View Controler and Favorite View Controller. And I don’t need to keep the intermedia statuses for the appplication logics, but It doesn’t mean we can remove all statuses, these statuses are useful in exchanging informations between view controllers. If the object owned by the view controller, I think you can use the Observable in the object through the property directly. But most of time, I need to create a stub in the target view controller like the Price View Controller, and bind this stub with the Observable in the source view controller like the Setting ViewController. When the SettingViewController is removed from the memory, the Variable showCoinOnly will be disconnected from its source and sleep. When the SettingViewController is created again, the connection will be rebuilt, and the showCoinOnly will resend the event from the SettingViewController to the filtering logic chain as a router.


In this diagram, you can see I create a two way bind in the SettingViewCOntroller, the showCoinOnly in the PriceViewController will keep the status, when the SettingViewController is created again, the Switch will get the status again. But how to write a 2-way bind is confusing me, I just wrote the code below, but I don’t know why it didn’t cause the infinitive problem.

1
2
3
4
5
6
7
showCoinOnlySwitch.rx.isOn.changed.debug()
.bind(to: _selectShowCoinOnly)
.disposed(by: disposeBag)

didSelectShowCoinOnly.debug()
.bind(to: showCoinOnlySwitch.rx.isOn)
.disposed(by: disposeBag)

And if you want to use 2-way bind in other place, you can create a generic funtion to handle this.

1
2
3
4
5
6
7
8
9
10
11
12
13
14
infix operator <->

@discardableResult func <-><T>(property: ControlProperty<T>, variable: Variable<T>) -> Disposable {
let variableToProperty = variable.asObservable()
.bind(to: property)

let propertyToVariable = property
.subscribe(
onNext: { variable.value = $0 },
onCompleted: { variableToProperty.dispose() }
)

return Disposables.create(variableToProperty, propertyToVariable)
}

The Problems I met

The scope of a status

When I implement the application logic, I realize that there are three kinds of status I need to mantain.

  1. Local Status
    To be honest there is no local status when we use the RxSwift, the RxSwift doesn’t keep the status, it just trigger events from the Observables and consume these events by the Observers. I use this terminology in order to distingush the other two statuses.
  2. Status as a property
    Just like I discuss in the last section, the showCoinOnly in the PriceViewCOntroller keep the status transfered from the SettingViewController. This Variable will share information between two view controllers, one will be released, the other is alway keeping in the memory. In this case I keep the status in the PriceViewcontroller, because, the PriceVIewController will not be released in the application whole life time.
  3. Global status
    But sometimes the two controllers who share inforamtion will all be released. So how can I keep the status like the KLineSource in this application. The KLineSource is produced from the SeetingViewController when a user select the datasource on the segment control, and the KLineSource si consumed by the ExpandViewController to determine which APIs will be called. But these two view controllers will be release at runtime. So where can I keep the status. In this demo example I create a singleton global object to keep this status called KLineSource.
1
2
3
4
5
6
7
8
9
10

class KLineSource {
static let shared = KLineSource()

var dataSource = Variable<DataSource>(DataSource.cryptoCompare)

private init() {

}
}
How to initialize the RxSwift reactive chain when some of these view controllers are created dynamically

Because some of these view controllers will be created dynamically, it bring
another problem what is the appropriate time to create a view controller, and when to bind the reaction chain. When we create a view controller and send a event to its Observer, it won’t get this event if it hasn’t band the the Observer first.

1
2
3
4
5
6
7
8
9
10
11
12
13
override func prepare(for segue: UIStoryboardSegue, sender: Any?) {
super.prepare(for: segue, sender: sender)
segue.destination.transitioningDelegate = self

if let navigationController = segue.destination as? SettingsNavigationController,
let settingsViewController = navigationController.viewControllers.first as? SettingsViewController {

settingsViewController.didSelectShowCoinOnly
.bind(to: showCoinOnly)
.disposed(by: disposeBag)

// FIXED: How to save the status
settingsViewController._selectShowCoinOnly.onNext(showCoinOnly.value)

When the seague is triggered, the SettingViewControler will be created, and I will send the ShowCoinOnly status to the SettingViewController. But if I put the binding code in the ViewDidLoad() in the SettingViewController, this event will be discarded because when the event is being sent, the chain hasn’t been setup yet. So I need to move the setup logic into awakeFromNib(). And I also need to load the view objects first compulsively like the code below.

1
2
3
4
5
6
7
8
9
10
11
12
13
14
15
16
17
18
19
20
21
22
23
24
25
26
27
28
29
30
31
32
33
34
35
36
37
38
39
40
41
42
43
44
45
46
47
48
49
50
51
52
53
54
55
56
57
58
59
60
61
62
63
64
65
66
override func awakeFromNib() {
super.awakeFromNib()
// FIXED: How to save the status..., force load view
_ = self.view

let closeButton = UIBarButtonItem(title: "Close", style: .plain, target: self, action: nil)
self.navigationItem.leftBarButtonItem = closeButton

dataSourceSegment.selectedSegmentIndex = KLineSource.shared.dataSource.value.rawValue

setupBindings()
}

override func viewDidLoad() {
super.viewDidLoad()
}
```

It is not very comfortable, I didn't find any other good solution before we use the coordinator. One resposibilty of the coordinator is maintaining the lifecycle of ViewModels and the Controllers. It will be a solution to fix this issue. But before we jump to the MVVM-RxSwit-Coordinator, we must create the ViewModel layer first.

## Create the ViewModels
View Models are extracted from view controllers. The process of building the view models is separating our application logics from view controllers. The view controller only keep the resposibilities for
1. maintain lifecycle of it's views
2. create a view model
3. connect inputs and outputs of the view model to the view elements

<img src="/From-MVC-to-MVVM-C-Step-by-Step/MCVMVMV.gif" width="100%" margin-left="auto" margin-right="auto"><br>

View models are not depending on view controllers. They only include application logics, so they are easy to be tested.

One typical view model in our demo is the SettingViewModel.

``` Swift
class SettingViewModel {
// MARK: - Inputs
let selectDataSource: AnyObserver<DataSource>
let selectShowCoinOnly: AnyObserver<Bool>
let removeMyFavorites: AnyObserver<Bool>
let cancel: AnyObserver<Void>

// MARK: - Status

// MARK: - Outputs
let didSelectDataSource : Observable<DataSource>
let didSelectShowCoinOnly: Observable<Bool>
let didRemoveMyFavorites: Observable<Bool>
let didCancel: Observable<Void>

init() {
let _selectShowCoinOnly = BehaviorSubject<Bool>(value: false)
self.selectShowCoinOnly = _selectShowCoinOnly.asObserver()
self.didSelectShowCoinOnly = _selectShowCoinOnly.asObservable()

let _removeMyFavorites = PublishSubject<Bool>()
self.removeMyFavorites = _removeMyFavorites.asObserver()
self.didRemoveMyFavorites = _removeMyFavorites.asObservable()

let _cancel = PublishSubject<Void>()
self.cancel = _cancel.asObserver()
self.didCancel = _cancel.asObservable()

let _selectDataSource = BehaviorSubject<DataSource>(value: DataSource.cryptoCompare)
self.selectDataSource = _selectDataSource.asObserver()
self.didSelectDataSource = _selectDataSource.asObservable()
}
}

We don’t have the coordinator yet, so the SettingViewController is still responsable for creating it’s view model and connecting the inputs and outputs of the view model to some view controls and inputs and outputs of other view controllers.

If we take a picture of the SettingViewModel, we can get the diagram below:


In this diagram, you can see the main logic on the client side is included in the PriceViewModel. This view model is just one class, and rely on any other views and view controllers. So we can write a test for it easily.

The Fininal Step, Build a coordinator tree.

I call it as a coordinator tree, because, all of our coordinators which corresponds their view controllers, and have parent-children relationship like view controllers.

The top node of this tree is the AppCoordinator, it contains two coordinators, one is PriceCoordinator and the other FavoriteCoordinator.

All coordinators are inherited from BaseCoordinator. The main job of a coordinator is

  1. create a view model
  2. ceeate a view controller
  3. inject the view model into the view controller
  4. maintain the navigation between view controllers.

The fourth one can be separated some sub-steps

  1. creat a target coordinator as an observable object
  2. flatmap some of source coordinator obserable into the target observable, this process is most like calling a networking service.
  3. bind the source coordinator input onto the target coordinator, so we can get the result from the target coordinator.

The whole process looks like calling a asynchronization function, when we start a new coordinator. Every coordinator must comfirm the start() function. In this funtion the coordinator returns an Observable object for it’s source coordinator.

1
2
3
4
5
6
7
8
9
10
11
12
13
14
15
16
17
18
19
20
21
22
23
24
25
26
27
28
29
30
31
32
33
34
35
36
37
38
39
40
41
42
43
44
45
46
47
48
49
50
51
52
53
54
55
56
57
58
59
60
61
62
63
64
65
66
67
68
69
70
71
72
73
74
override func start() -> Observable<Void> {
let navigationViewController0 = rootViewController.viewControllers![0] as! UINavigationController
let viewController = navigationViewController0.viewControllers[0] as! PricesViewController

let navigationViewController1 = rootViewController.viewControllers![1] as! UINavigationController
let favoritesViewController = navigationViewController1.viewControllers[0] as? FavoritesViewController

let viewModel = PriceViewModel()
viewController.viewModel = viewModel

let showSettings = viewModel.showSettings
.flatMap { [weak self] _ -> Observable<SettingCoordinationResult> in
guard let `self` = self else { return .empty() }
return self.showSettings(on: viewController, with: viewModel)
}.share()

showSettings
.filter({
if case .kLineDataSource = $0 {
return true
}
return false
})
.map {
if case .kLineDataSource(let value) = $0 {
return value
}
return DataSource.cryptoCompare
}
.bind(to: GlobalStatus.shared.klineDataSource)
.disposed(by: disposeBag)

showSettings
.filter({
if case .showCoinOnly = $0 {
return true
}
return false
})
.map {
if case .showCoinOnly(let value) = $0 {
return value
}
return false
}
.bind(to: viewModel.showCoinOnly)
.disposed(by: disposeBag)

showSettings
.filter({
if case .removeMyFavorites = $0 {
return true
}
return false
})
.map {
if case .removeMyFavorites(let value) = $0 {
return value
}
return false
}
.bind(to: (favoritesViewController?.viewModel.deleteFavoriteList)!)
.disposed(by: disposeBag)


window.makeKeyAndVisible()

return Observable.never()
}

private func showSettings(on rootViewController: UIViewController, with rootViewModel: PriceViewModel) -> Observable<SettingCoordinationResult> {
let settingsCoordinator = SettingCoordinator(rootViewController: rootViewController, rootViewModel: rootViewModel)
return coordinate(to: settingsCoordinator)
}

The relationship between these objects is showed in the figure below:


So far we have finished our demo example. It is not a real project, but it is also not very simple. I show you how to refactor the code from MVC pattern to MVVM-Coordinator pattern. And this example also includes some key points to write a iOS application, such as networking service, autolayout, …

I hope it is helpful for the newbs in iOS develepment.

What’s it like to ride in a self-driving car?

Posted on 2018-08-01 | In Tech

这是一篇引用 Medium上Tom Standage最新关于无人驾驶的文章.

What’s it like to ride in a self-driving car?

乘坐无人驾驶车是一种什么感觉?

It’s thrilling for a minute or two, and then boring. Which is a good thing
头两分钟先是兴奋, 然后就感到无聊. 但这应该是一个好事

Where we’re going, we don’t need steering wheels
我们打算去哪里, 我们不需要方向盘

Autonomous vehicles (AVs) are one of the most talked-about technologies of the moment. And little wonder: they promise to revolutionise the transport of people, and physical goods, just as dramatically as the internet transformed the delivery of information. But they raise many questions. When will they be available? Will they be safe? Will they make car-ownership obsolete? And most of all: what is it like to ride in a car that drives itself?

无人驾驶是目前谈论的最多(最热门)的技术之一. 并不奇怪: 就像互联网改变了信息的传播方式一样的戏剧性, 无人驾驶技术承诺给人员和货物的运输带来革命性的巨变的同时也带来了诸多疑问. 这些技术啥时候成熟? 它们安全吗? 它们会使人们不再需要对车辆有拥有权吗? 这其中最重要的问题是: 乘坐自动驾驶的车辆到底是一种怎样的体验?

I’ve spent the past few months working on a 10,000-word special report on AVs for The Economist, which was published in this week’s issue. The focus of my report is mostly on the long-term implications of AVs, based on the assumption (a reasonable one, I think) that the technology can be made to work reliably in the next few years. Rather than focusing on the minutiae of things like the ever-changing industry alliances, or who is suing who, I concentrated instead on the impact on urban planning, the transformation of retailing and the broader social and political implications of cars that can drive themselves. I spoke to as many urban planners and social historians as machine-learning experts or car-industry executives. All this horizon-scanning and future-gazing was fun. But to kick off the report, I had to actually go in a self-driving car. Which is how I found myself, on a snowy morning a few weeks ago, standing in a car park in Pittsburgh, waiting for an automated ride.

我已经花了几个月的时间为”经济学人”准备一份关于无人驾驶车辆10,000字的特别报告, 这份报告会在本周发表. 基于技术在今后的几年内应该变得更加成熟的假设(这是一个合理的假设), 我的这份报告主要关注点在于无人驾驶(对我们的)长期影响. 与其去关注那些细枝末节的事情, 例如不断变化的行业联盟, 或者谁起诉了谁, 我更加关注无人驾驶车辆对城市规划的影响, 对零售业的改变和对更广泛的社会和政治的影响. 我和很多城市规划者, 社会历史学家, 也包括机器学习专家, 汽车行业的高管交谈过. 所有这些全方位的审视和对未来的展望都非常有趣. 但是抛开这份报告, 我觉得我更有必要坐进一辆无人驾驶的车里. 这就是为啥, 在前几周的一个下雪的早上, 我发现自己站在匹兹堡的一个停车场, 等待一次无人驾驶的体验.

Three years ago I went in a self-driving car in Shanghai. It was quite a basic example: what is known in the field as a “Level 2” vehicle. This means it can steer itself, and maintain a safe distance from the car in front, while driving in highway traffic. I rode in an Audi A7, and a few cars now on the market (notably those made by Tesla) are capable of Level 2 automation. But the driver is required to keep hands on or near the wheel, and to pay attention to the surroundings, in case anything unexpected happens. With the next level up, Level 3, the car takes more responsibility for monitoring its surroundings, allowing the driver to relax a bit more. But if the car encounters a situation it cannot deal with, it sounds a warning telling the driver to resume control. The first Level 3 vehicle, the Audi A8, goes on sale this year.

三年前我在上海尝试过一辆无人驾驶汽车. 那是一辆最基本的样车: 在这个领域内作为”Level 2”的车辆. 这意味着它可以在高速公路上自动驾驶, 并保持于前方车辆一定的安全距离. 当时我乘坐的是一辆Audi A7, 现在市场上达到Level 2的车辆有好一些了(尤其是Tesla生产的). 但是驾驶员需要把手放在方向盘上或靠近方向盘的地方, 并且注意周围的环境, 才能应对任何不可预期的事情发生. 再上一个级别的, 就是Level 3, 这类的车辆可以监控它周围环境时承担更多的责任, 让驾驶员更加的轻松. 但是如果这类车辆遇到它不能处理的情况, 就会发出警告的声音用来提醒驾驶员恢复控制. 第一辆Level 3的车辆, Audi A8, 今年会开卖.

Level 2 and Level 3 are really just glorified forms of cruise control. A truly self-driving vehicle doesn’t just follow the road ahead of it. It does route-planning and knows where it’s going. It handles junctions, crossings, traffic lights and road signs, and interacts smoothly with other vehicles, pedestrians and cyclists. This is, to say the least, a big leap. A Level 4 vehicle is defined as one that can do all of this, without any input from a human driver, within a limited area: in practice, a city neighbourhood that has been mapped in very fine detail, to give the car a big head start in understanding its surroundings. A Level 5 vehicle (something that does not yet exist) is one that can in theory drive anywhere, like a human driver. That may be an unattainable goal: some people dislike driving at night, or in snow, and I would not volunteer to drive a car in Delhi unless I really had to. The upshot is that the most advanced AVs on the roads today are generally Level 4 vehicles that operate within specific regions of particular cities.

Level 2和Level 3基本上就是定速巡航的增强形式. 真正的无人驾驶汽车不仅仅是沿着路, 朝前开而已. 它也要规划路线, 并且知道它打算去哪里. 它可以处理遇到车辆汇入点, 十字路口, 交通信号灯和路面的标志时的各种状况, 并且和路面上的其他车辆, 行人和自行车平稳的互动. 这个至少才可以说是一个巨大的飞跃. 在一个被限定的区域内, Level 4的无人驾驶车辆就是可以在没有任何人类驾驶员干预的条件下完成上述所有目标的车辆. 这个被限定的区域实际上就是已经被精细的绘制在地图上的城市, 这让我们的无人驾驶车辆在理解它的周围环境中有了一个很好的开端. Level 5的无人驾驶车辆(目前还不存在)就是那种理论上可以在任何地方无人驾驶的车辆, 就像人类驾驶员一样. 这也许是一个无法达成的目标: 有些人不喜欢在夜间开车, 或下雪的时候开车, 同样我也不愿意在”Delhi”自愿开车, 除非迫不得已. 结果就是目前路上最先进的无人驾驶车辆只是一般意义上的第4代无人驾驶车辆, 只能在特定的城市的指定区域驾驶.

Different cities offer different testing environments. Phoenix, Arizona is popular because it has a regular grid system and reliably good weather (snow can confuse the LIDAR sensors that AVs use to scan their surroundings). AVs can also be seen on the roads in and around Mountain View, for similar reasons, and because so many technology firms are based in the Bay Area. The early history of self-driving vehicles was shaped by the rivalry between Stanford University in California and Carnegie Mellon University in Pittsburgh, which have produced many of the engineers now leading AV projects around the world. This has made Pittsburgh another hub of AV research and testing. The city is considered a more challenging environment than Phoenix, because its road layout is more complex, and the weather is worse. San Francisco’s urban environment is particularly complex, which is why Kyle Vogt, the boss of Cruise, an AV startup acquired by General Motors, says it is the best place for testing (check out his blog post for some very impressive video footage). If you can make it there, you might say, you can make it anywhere.

不同的城市提供不同的测试环境. 亚利桑那的凤凰城比较受欢迎, 是因为它有着规则的网格道路和好天气(大雪可以让无人驾驶车辆扫描他们周围环境的LIDAR传感器失灵). 基于同样的理由, 我们也可以在山景城的路上看到无人驾驶车辆, 也是因为太多的技术公司都在湾区. 无人驾驶的早起历史是由加州的斯坦福大学和匹兹堡的卡内基梅隆大学竞争而形成的, 这给现在的世界输出了大量的工程师来引导无人驾驶的项目. 这点也让匹兹堡成为另外一个无人驾驶的研究和测试中心. 这座城市具有被认为比凤凰城更具有挑战的环境, 因为它的马路的布局更加复杂, 并且天气情况更加恶劣. 旧金山的市区的环境也是特别复杂, 直就是为啥被通用汽车收购的无人驾驶创业公司的老板Kyle Vogt, 认为它是最佳的测试地点(你可以在他的博客上找到很多印象深刻的视频短片). 如果你在旧金山可以搞定, 你可以说你可以在任何地方搞定无人驾驶.

A self-driving Uber vehicle. That round thing on the top is the LIDAR sensor.

Anyway, back to Pittsburgh. Uber has hired a lot of engineers from Carnegie Mellon, and Uber’s Advanced Technologies Group, which is developing its self-driving cars, is based in the city. The vehicle I climbed into was a modified Volvo XC90, with a bundle of extra sensors, including cameras and a spinning LIDAR unit, on its roof. Ryan, the vehicle’s safety driver, manually drove the vehicle out of the car park and onto the public roads, before pressing a button to engage the self-driving system. And then the car started driving itself.

不管怎么说, 先回到让我们先回到匹兹堡. Uber已经从卡内基梅隆雇佣了大量的工程师, Uber开发它无人驾驶车辆的技术团队也坐落在匹兹堡. 我爬进去的是一辆根据Volvo XC90改造的车辆, 车顶上带着一堆外置的传感器, 包括摄像头和可以转动的LIDAR单元. Ryan, 这辆车的安全驾驶员, 在按下一个按钮启动自动驾驶系统之前, 他驾驶这辆车从停车场开出来, 并且开到马路上. 然后这辆车才开始靠它自己驾驶.

At first, the experience is thrilling. It seems like magic when the steering wheel turns by itself, or the car gently slows to a halt at a traffic light. The autonomous Uber drove carefully but confidently in downtown traffic and light snow, slowing down when passing a school or approaching the brow of a hill, and putting its foot down (as it were) when faced with an open, straight road with no other traffic. The most noticeable difference from a human driver was that the vehicle made no attempt to avoid Pittsburgh’s notorious potholes, making the ride slightly bumpy at times. Sitting in the back seat, I could see a digital representation, displayed on an iPad mounted between the front seats, of how the car perceived the world, with other vehicles, pedestrians and cyclists highlighted in clusters of blue dots. I felt as though I was living in the future. But then, after a minute or two, the novelty wore off. When technology works as expected, it’s boring.

起初的体验是很激动人心的. 当方向盘自己转动的时候, 或者这辆车渐渐的减速停在交通信号灯前, 使它看上去像魔法. 这个无人驾驶的Uber在市中心拥挤的交通和小雪的情况下小心并自信的驾驶着, 当通过学校或接近山顶的时候会降低自己的速度, 并且在遇到开阔的没有其他车辆的直行道路上, 它会踩下油门(就好像踩下油门). 和人类司机相比较最大的区别就是这辆车没有试图躲避匹兹堡名声狼藉的坑坑洼洼, 使整个驾驶过程有些轻微的颠簸. 坐在后排, 我可以看见一个数字仪表盘, 显示在一个安装在前排座椅中的的iPad上, 用高亮的一组蓝点标记其他车辆, 行人和自行车, 展现无人驾驶的Uber是如何观察这个世界的. 我感觉自己就像生活在未来世界. 但是过了几分钟, 新奇感就消失了, 技术如预期的工作, 它是显得很枯燥了.

How the car sees the world. Objects of particular interest are shown in blue.

This is, in fact, exactly the reaction that engineers are hoping for. Noah Zych, Uber’s head of system safety for autonomous cars, told me that after working on AVs for ten years, he was finally able to offer his parents a ride in a self-driving car last year when they came to visit. After their ride ended, he asked them what they thought of it. “And my mom said, ‘actually, it was kind of boring’. And that’s the response that we really want,” he says. Uber has offered some riders in Pittsburgh and Phoenix the option to travel in its self-driving vehicles, provided the start and end points of their ride fall within their area of operation. (Riders can say no if they want to.) Around 50,000 people have travelled in Uber’s self-driving cars in the past couple of years. Uber wants to understand how to design the in-car experience (such as what information should be shown on the screen), and it also wants to reassure both riders and other road-users about the safety of autonomous vehicles. “The best way to convince people that a self-driving vehicle is going to be safe and capable of driving them around in the future is to give them that first experience,” says Mr Zych.

事实上, 这是工程师们期待的反馈. Noah Zych, Uber自动驾驶系统安全部门的头, 他告诉我他的无人驾驶领域工作了十年后, 他终于可以给来去年来参观的父母提供一次无人驾驶的乘坐体验. 试乘体验之后, 他问他们的感受. “然后我母亲说, ‘事实上, 有些无聊’, 这就是我们想要的反馈,”. Uber已经为在匹兹堡和凤凰城的一些车手提供无人驾驶车辆的选择, 只要他们提供的驾驶的起始点和终点落在可以操作的区域内. (驾驶者可以说不, 如果他们想这样的话). 在过去的几年里, 大概有50,000左右的人已经参与了Uber的无人驾驶体验. 通过这些反馈, Uber想知道如何设计车内的体验(例如怎样的信息应该被展示到屏幕上), 并且它也想让乘客和路人对无人驾驶感到放心. Mr Zych说, “最好的方式说服人们无人驾驶的车辆在未来会变得越来越安全就是给他们提供一手的体验”.

Ryan, the safety driver in my self-driving Uber, had to take over occasionally, for example to steer the car around a delivery truck that had blocked the road — the car was programmed to play things safe and wait, rather than cross the double-yellow lines in the middle of the road — and to guide the car through roadworks where the lane markings had been recently changed. A couple of times he also took over when the car looked as though it might be passing a bit too close to another vehicle. In each case a collision was unlikely, Ryan explained, but if people think a collision is imminent, they will not feel safe. So part of his job is to flag up instances where the car’s driving style could be tweaked to provide a better experience for passengers. At the end of each day, the contents of the car’s on-board computers are downloaded for analysis. Each time the safety driver had to take over — an event known as a “disengagement” — the corresponding data can be analysed to see how the car’s software could be improved. It is then possible to simulate how the car would have responded with various modifications to its algorithms. “We can play it back again and again, vary the scenario and see the distribution of outcomes,” says Mr Zych. After being tested in simulation, the improved software is then rolled out in real vehicles. It is first tested on a small subset of routes, called “canonical” routes, which test different aspects of its behaviour. If it works as expected, the software is then rolled out for general use.

Ryan, 是我的自动驾驶车里的安全司机, 有时候不得不主动接管车辆, 举例来说, 驾驶车辆绕开挡住马路的一辆卸货卡车 - (遇到这种情况)这辆自动驾驶的车辆被设定保持尽可能的安全, 并且进入等待状态, 而不是穿过马路中间的双黄线 - 并引导车辆通过最近改变车道标线的道路工程. 有几次, 当这辆车子看上去好像和其他车辆过于接近的时候, 他也接管了驾驶. Ryan解释到, 碰撞的情况其实是不会发生的, 但是如果人们认为碰撞将要发生, 他们会感到不安全. 为了给乘客提供更好的体验, 他的部分工作就是在这辆车驾驶风格中可以微调的地方标记这些实例. 每天工作结束前, 这辆车子的车载电脑上的内容会被下载下来用以分析. 每次安全司机不得不介入的情况被认定为一次”脱靶” - 对应的数据可以被分析用来如何改进这辆车的软件. 这样就可以模拟如何让车辆通过对算法的改进来做出不同的响应. 在模拟环境中测试之后, 改进的软件会在真实的车辆中更新. 我们可以一次又一次地回放,改变场景并查看结果的分布. 首次测试会在线路选取较小的子集进行, 称之为”标准的”线路, 用来测试软件的不同方面. 如果按照预期的工作, 软件会正式升级.

I spent most of my hour in a self-driving Uber discussing disengagements, algorithm design and user interfaces, which (to me, at least) are just as exciting as being in a futuristic robocar. And even when the driving algorithms are working perfectly, there are several practical questions that still have to be addressed. For example, how will people actually hail driverless vehicles? They can’t just stop anywhere, or they will block traffic and annoy people. Human drivers can pick a good place to stop, but machines will need help. Uber has already started identifying good pick-up and drop-off points in some cities, and suggesting them to riders of human-driven vehicles. But it may be that in future, streets will have designated pick-up and drop-off areas; already, some university campuses and apartment blocks are being built with ride-hailing in mind. And how will a self-driving vehicle be able to tell that everyone is on board and ready to go? Some kind of “start” button will be needed — and a “stop” button, too, in case a rider suddenly wants to get out of the vehicle. (The driverless Uber has a “pull over” button for this.)

我在这辆自动驾驶的Uber上花了大量的时间(和Ryan)讨论”脱靶”的情况, 算法设计和用户界面, 这些对于我来说和在一辆未来的robocar一样激动人心. 然而即使当驾驶算法可以完美的工作, 这里仍然有一些实际的问题需要被解决. 举例来说, 将来人们如何和无人驾驶车辆打招呼? 它们不可以随便停车, 否则它们会阻塞交通并且干扰人们(的正常活动).无人驾驶车辆如何能够告诉车上的乘客准备出发? 某种类型的”开始”按钮还是需要的 - 当乘客忽然想下车的时候, “停止”按钮也是需要的. 但是或许不久的将来, 街道会重新设计上客和下客的区域. 人类的司机可以选择一个最佳的地方停车, 但是机器仍然需要协助. Uber已经开始在某些城市标识理想的上客和下客的位置, 并且建议他们乘坐人类驾车辆. 已经有一些大学校园和公寓大楼正在建设中(with ride-hailing in mind). (无人驾驶的Uber有一个”靠边停车的”按钮来对应这种情况).

Waymo, the self-driving unit of Google’s parent company, hopes to launch a robotaxi service in Phoenix later this year. Waymo has the lowest disengagement rate in the industry, and is generally considered the leader in the field; its autonomous vehicles can now operate in Phoenix without the need for safety drivers. GM’s Cruise, which is fast catching up with Waymo, hopes to launch a robotaxi service in 2019, using autonomous Chevy Bolts that do not have a steering wheel, pedals or any other kind of manual controls. So they, too, will have to be able to operate entirely autonomously without a safety driver. Dozens of other firms are also working on self-driving vehicles. Over the coming months and years more AVs will take to the roads in more cities, and the areas in which they operate will gradually expand. Probably sometime in the 2020s, you will take your first ride in a self-driving car. It will be exciting at first — but then, if all goes well, it should quickly become reassuringly boring.

在今后的几年里, Waymo, Google母公司的自动驾驶部门, 打算在凤凰城提供无人驾驶的出租车服务. 在业界, Waymo的”脱靶”率是最低的, 并且被公认为这个领域内的领导者; 通用汽车的Cruise, 是最接近Waymo技术的, 他们希望在2019年提供无人驾驶的出租车服务, 使用自动驾驶的Chevy Bolt, 这种车没有方向盘, 踏板和其他各种手动控制的东西. 所以它们将不得不在没有安全司机的情况下完全自动驾驶. 一堆其他的公司都正在研发自动驾驶的车辆. 在今后的几个月里和几年内, 更多的无人驾驶车辆将会在更多的城市里上路, 并且它们的行驶范围会更加广阔. 有可能在2020年, 你可以在无人驾驶的车辆. 它首先将会是兴奋的, 然后, 如果它运行正常, 它会变得让人踏实的无聊.

Waymo’s fully self-driving cars are here

English Grammar

Posted on 2018-07-29 | Edited on 2018-08-06 | In english

Table of Contents

  1. Overview
  2. Sentences & Complements
  3. Patterns Conversion
  4. Verb Tenses - Time(时) & Aspect(态)
  5. Verbals
  6. Moods
  7. Reduced Clauses
  8. Preposition
  9. Article

I. Overview

  • This is my english grammar note depended on 旋元佑先生的<<英语魔法师之语法俱乐部>>
  • 以下笔记是学习旋元佑先生的<<英语魔法师之语法俱乐部>>的学习笔记

II. Sentences & Complements

A. Five different verbs correspond to five basic sentence patterns (五种不同特性的动词对应五种基本句型)

a. S+V (Intransitive Verb)
  1. John Smith died in World War Two.
b. S+V (Transitive Verb)+O
  1. John Smith killed three enemy soldiers.
c. S+V (Transitive Verb)+O+O
  1. John‘s father gave him a dog.
d. S+V (Linking Verb)+C
  1. The soup is too hot.
  2. John Smith was a soldier.
  3. John Smith was courageous.
  4. I feel sick.
e. S+V (Linking Verb)+O+C
  1. The food made me sick.
  2. Most people consider a nurse a good wife.
  3. I find the dress pretty.
  4. The meat made the dog friendly.
  5. John’s father called him a dog.
  6. His college training made him a teacher.
  7. I don’t find the drug bitter.
  8. I consider the story false.
  9. He found the trip exciting.

B. What are Linking Verbs (Followed by Complements or Objects + Complements) (链接动词跟补语)

In English, linking verbs can not be omitted. But when we translate them into Chinese, and also if the complements are adjectives, “是” will be omitted. (英语中Be动词在句子中不能省略, 但翻译成中文,如果补语是形容词,“是”会被丢弃)

  1. Taroko Gorge is beautiful. Taroko Gorge _是_ 美丽的
  2. The soup is too hot. 汤 _是_ 太烫了

In addition to ‘Be’, What else are Linking Verbs.(除了Be, 还有哪些Linking Verb)

是 Example 为(是的文言文) Example
look That dress looks pretty. turn(转变为)
seem(似乎是) The dog seems friendly. prove(证实为) The story proved false.
appear(显得是) His demands appear reasonable. become(成为) He became a teacher.
sound His trip sounds exciting. make(作为) A nurse make a good wife.
feel I feel sick.
taste The drug tastes bitter.

Because these linking Verbs themselves have no abilities to describe something detail, so we must use complements to make sentences completed. There are two types of words can be complements. (Linking Verb本身没有叙述能力, 需要用Complement补足句子, 补语有两种词类)

  1. noun - the same relationship with the subject (表达与主语的同等关系)
  2. adjective

C. When “Be” is not a Linking Verb (Be不作为Linking Verb, 不解释为”是, 而是要解释为”存在”, 用在S+V句型中)

  1. I think, therefore I am. (René Descartes, 笛卡儿)
  2. To be or not to be, that is the question. (@Hamlet, 哈姆雷特)

III. Patterns Conversion

A. Affirmative Sentences (肯定句) → Negative Sentences (否定句)

  1. Be + Not
    • I am a girl.
      • → I am not a girl.
    • You are a student.
      • → You are not a student.
      • → You aren’t a student.
    • This is Tom’s bag.
      • → This is not Tom’s bag.
      • → This isn’t Tom’s bag.
  2. Add Negative Form of Auxiliary (don’t/doesn’t/didn’t) before Transitive Verbs (及物动词)/Intransitive Verbs (不及物动词)(在动词前加助动词的否定形式, don’t/doesn’t/didn’t)
    • They really know what will happen.
      • → They really don’t know what will happen.
    • Someone know what he/she is missing.
      • → Someone doesn’t know what he/she is missing.
    • I want to write this.
      • → I didn’t want to write this, but the courage to listen to different ideas is vanishing
  3. Auxiliary + Not, can not/should not/will not
    • Trump can keep his corruption hidden forever.
      • → Trump cannot keep his corruption hidden forever.
    • You should do that.
      • → You should not do that.
    • Turkey will back down due to US sanctions.
      • → Turkey will not back down due to US sanctions.
      • → Turkey won’t back down due to US sanctions.
  4. some → any
    • I got some nice presents for Christmas this year.
      • → I didn’t get any nice presents for Christmas this year.
    • I’d like to go somewhere hot this summer.
      • → I’m not hungry. I don’t want anything to eat.

B. Affirmative Sentences → 一般疑问句 (General Questions)

  1. Put “Be” at the begin of the sentence (Be动词放在句首)
    • I am in Class 6.
      • → Are you in Class 6?
    • There are some apples.
      • → Are there any apples?
  2. Under the Transitive verbs/Intransitive verbs, put “Do/Does/Did” at the begin of the sentence
    • I like red.
      • → Do you like red?
    • He wants to play soccer with friends.
      • → Does he want to play soccer with friends?
    • We finished our homework before nine yesterday.
      • → Did you finish your homework before nine yesterday?
  3. Put auxiliary(can/shall/will/…) at the begin of the sentence
    • I will go to hospital tomorrow.
      • → Will you go to hospital tomorrow?
    • He can climb the tree.
      • → Can he climb the tree?
  4. some → any
    • We can use some in questions when offering/requesting:
      • Would you like some more tea?
      • Could I have some milk, please?
      • Do you want something to eat?
    • We use any in positive sentences when we mean it doesn’t matter which ..:
      • You can come and ask for my help any time.
      • Which book shall I read? - Any one. It’s up to you.
      • You can sit anywhere but here. This is my seat!

C. Affirmative Sentences → Information Questions (特殊疑问句)

  1. Underline a question part (划出提问部分)
  2. Use a question word to replace this underline, put the question word at the begin of the sentence, and add auxiliary if needed, then exchange the position with the subject (用疑问词替代划线部分, 并移到句首)
  3. And add auxiliary if needed, then exchange the position with the subject (加助动词, 并颠倒主谓)
    • Mike is a worker.
      • → What is Mike?
    • He is ~~my brother~.
      • → Who is he?
    • The box is on the desk.
      • → Where is the box?
    • It’s seven twenty.
      • → What time is it?
    • I usually get up at six.
      • → When do you usually get up?
    • I am twelve.
      • → How old are you?
    • My hat is blu.
      • → What color is your hat?
    • I can see five kites.
      • → How many kites can you see?
    • There is some milk in the glass.
      • → How much milk is there in the glass?
        1* This pen is nine yuan.
      • → How much is this pen?
        1* That is my book.
      • → Whose book is that?
        1* The bag is yours.
      • → Whose is the bag?
  4. If the question word is subject, then keep the position (如果疑问词作主语(Subject)或主语的定语, 语序保持陈述句的语序)
    • He is my brother.
      • → Who is he?
    • He is my brother.
      • → Who is my brother?

IV. Verb Tenses

A. Simplify (以简驭繁的方式)

  • One sentence only has two aspects, simple and perfect. Add “Be” or “Have/has been” before the original verb. Replace original verb with present participle(Ving) to describe in progress, and replace original verb with past participle(Ven) to describe passive voice.

  • Time(Past/Present/Future)和Aspect分开处理

  • 当需要表达进行或被动语态时, 把Be动词当作动词, 句子只有两种Aspect状态(简单态与完成态), 其后的现代分词(Ving)和过去分词(Ven)视为形容词补语, Ving表示Continuous, Ven表示Passive Voice
  • 根据Time和Aspect变换Be动词

B. Simple

a. Past
  1. Ved
    • The U.S. established diplomatic relations with the P.R.C in 1979.
    • Bush was the U.S. President.
  2. Was/Were + Ving
    • I was visiting clients the whole day yesterday.
    • I was watching TV when I heard the doorbell.
  3. Was/Were + Ven
    • The movable print was introduced to England in 1485.
  4. Was/Were + being Ven
    • The witness was being questioned in count when he had a heart attack.
    • The house was being painted when we arrived.
b. Present
  1. V
    • All mothers love their children.
    • Huang pitches a fast ball. Li swings. It looks like a hit.
      The shortstop fails to stop it. It’s a double.
    • Trump is the U.S. President.
  2. Is/Am/Are + Ving
    • 7-Eleven is selling big cokes at a discount this month.
  3. Is/Am/Are + Ven
    • The students’ questions are always answered by the teacher.
  4. Is/Am/Are + being + Ven
    • According to the NASA, the ozone layer is being depleted.
    • How is the new teaching method being tried there.
c. Future
  1. Will + V
    • We will rock you.
    • There will _be_ a major election in November.
  2. Will be + Ving.
    • Don’t call me at six tomorrow. I’ll still be sleeping then.
    • Michael will be drinking water.
  3. Will be + Ven
    • The building will be razed next month.
  4. Will be + being Ven(Unusually)
    • Water will be being drunk by Michael.
d. Past Future
  1. We told him that we would clean the house.

C. Perfect

a. Past
  1. Had + Ven
    • Many soldiers had died from pneumonia before the discovery of penicillin.
  2. Had been + Ving
    • I had been smoking three packs of cigarettes a day before I decided to quit.
  3. Had been + Ven
    • Japan had not been defeated yet by the time Germany surrendered unconditionally.
b. Present
  1. Has/Have + Ven
    • I’m sure I have seen this face somewhere.
  2. Has/Have been + Ving
    • We have been working overtime for a week to fill your order.
  3. Has/Have been + Ven
    • The house has been redecorated twice since they moved in.
c. Future
  1. Will have + Ven
    • Next April, I will have worked here for 20 years.
  2. Will have been + Ving
    • In two more minutes, she will have been talking on the phone for three hours.
  3. Will have been + Ven
    • Come back at 5:00. Your car will have been fixed by then.

V. Verbals

Type Pattern Part of Speech Role in Sentence Example
Present Participle (现在分词) Ving Adjectives (形容词) Complements
Past Participle (过去分词) Ven Adjectives (形容词) Complements
Gerunds (动名词) Ving Nouns (名词) Subjects/Objects/Complements
Infinitive (不定式短语) to do Nouns Subjects/Objects/Complements
Adjectives Subjects/Objects/Complements
Adverbials 修饰动词或形容词

A. Infinitive

a. From Auxiliaries to Infinitive (从助动词演变到不定式短语)
  1. I am glad because I can know you. S+V+C(Clause)
    • → I am glad because I am able to know you. Auxiliaries → be able to
      • → I am glad because I am able to know you. Conjunction, Subject and Be are omitted
Auxiliaries Infinitive
must have to
should ought to
will/would be going to
can/could be able to
may/might be likely to
b. Have an uncertain tone (都有不确定的语气)
  1. He is right. 他是对的
  2. He may be right. 他可能式对的
  3. He seems to be right. 他好像是对的
c. Use the Perfect to Express the Past (都是用完成式来表达相对过去的时间)
  1. In Progress (现在进行中)
    • It must be raining now. 现在一定下雨了
  2. Future Speculation (未来的推测)
    • It may rain any minutes.
    • It might even snow。
  3. Speculation about the past (对过去的推测)
    • It must have rained last night. 昨晚一定下过雨了
    • It seems to have rained last night. 昨晚好像下过雨
c. Infinitive VS Gerund
  1. plan
    • They plan that they will marry next month.
      • → They plan that they are to marry next month.
        • → They plan to marry next month.
  2. avoid
    • I avoid making the same mistake twice.
  3. hate
    • I hate I must say, but I think you’re mistaken.
      • → I hate I have to say, but I think you’re mistaken.
        • → I hate to say this, but I think you’re mistaken.
  4. like/dislike
    • I like to be the first.
    • I don’t like to wait too long.
    • I dislike standing in long lines. dislike没有”必须”(have to)的暗示
  5. try
    • I always try to be on time.
    • Why don’t you try being late for a change? 你何不故意迟到一次呢?
  6. remember
    • Please remember to give me a wake-up call at 6:00 tomorrow.
    • I remember calling her at 6:00 last night.
  7. shop
    • The speaker stopped talking at the second bell.
    • The speaker stopped a second to drink some water.
  8. Verbs Followed by Gerunds www.englishpage.com
    • 9 = verb followed by a gerund OR a noun + an infinitive
    • 13 = verb followed by a gerund OR an infinitive with a difference in meaning
    • 14 = verb followed by a gerund OR an infinitive with little difference in meaning
verb example
admit He admitted cheating on the test.
advise [9] The doctor generally advised drinking low-fat milk.
allow [9] Ireland doesn’t allow smoking in bars.
anticipate I anticipated arriving late.
appreciate I appreciated her helping me.
avoid He avoided talking to her.
begin [14] I began learning Chinese.
can’t bear [14] He can’t bear having so much responsibility.
can’t help He can’t help talking so loudly.
can’t see I can’t see paying so much money for a car.
can’t stand [14] He can’t stand her smoking in the office.
cease [14] The government ceased providing free healthcare.
complete He completed renovating the house.
consider She considered moving to New York.
continue [14] He continued talking.
defend The lawyer defended her making such statements.
delay He delayed doing his taxes.
deny He denied committing the crime.
despise She despises waking up early.
discuss We discussed working at the company.
dislike She dislikes working after 5 PM.
don’t mind I don’t mind helping you.
dread [13] She dreads getting up at 5 AM.
encourage [9] He encourages eating healthy foods.
enjoy We enjoy hiking.
finish [13] He finished doing his homework.
forget [13] I forgot giving you my book.
hate [14] I hate cleaning the bathroom.
imagine He imagines working there one day.
involve The job involves traveling to Japan once a month.
keep She kept interrupting me.
like [14] She likes listening to music.
love [14] I love swimming.
mention He mentioned going to that college.
mind Do you mind waiting here for a few minutes.
miss She misses living near the beach.
need [13] The aquarium needs cleaning.
neglect [14] Sometimes she neglects doing her homework.
permit [9] California does not permit smoking in restaurants.
postpone He postponed returning to Paris.
practice She practiced singing the song.
prefer [14] He prefers sitting at the back of the movie theater.
propose [14] I proposed having lunch at the beach.
quit [13] She quit worrying about the problem.
recall Tom recalled using his credit card at the store.
recollect She recollected living in Kenya.
recommend Tony recommended taking the train.
regret [13] She regretted saying that.
remember [13] I remember telling her the address yesterday.
report He reported her stealing the money.
require [9] The certificate requires completing two courses.
resent Nick resented Debbie’s being there.
resist He resisted asking for help.
risk He risked being caught.
start [14] He started studying harder.
stop [13] She stopped working at 5 o’clock.
suggest They suggested staying at the hotel.
tolerate I tolerated her talking.
try [13] Sam tried opening the lock with a paperclip.
understand I understand his quitting.
urge [9] They urge recycling bottles and paper.
  1. Verbs Followed by Infinitives www.englishpage.com
    • 8 = verb followed by an infinitive OR an optional noun + an infinitive
    • 13 = verb followed by a gerund OR an infinitive with a difference in meaning
    • 14 = verb followed by a gerund OR an infinitive with little difference in meaning
verb example
agree Tom agreed to help me.
appear His health appeared to be better.
arrange Naomi arranged to stay with her cousin in Miami.
ask [8] She asked to leave.
begin [13] He began to talk.
can’t bear [14] He can’t bear to be alone.
can’t stand [14] Nancy can’t stand to work the late shift.
care He doesn’t care to participate in the activity.
cease [14] The government ceased to provide free healthcare.
choose [8] I chose to help.
claim She claimed to be a princess.
continue [14] She continued to talk.
decide We decided to go to Hawaii.
demand He demanded to speak to Mr. Harris.
deserve He deserves to go to jail.
dread [13] I dread to think what might happen.
expect [8] They expect to arrive early.
fail He failed to get enough money to pay for the new project.
forget [13] I forgot to lock the door when I left.
get (be allowed to) Debbie gets to go to the concert next week! Why can’t I?
happen She happened to be at the bank when it was robbed.
hate [14] He hates to clean dishes.
hesitate She hesitated to tell me the problem.
hope I hope to begin college this year.
intend We intend to visit you next spring.
learn I learned to speak Japanese when I was a kid.
like [14] Samantha likes to read.
love [14] We love to scuba dive.
manage He managed to open the door without the key.
need [8,13] I need to study.
neglect [14] She neglected to tell me the date of the meeting.
offer Frank offered to drive us to the supermarket.
plan We plan to go to Europe this summer.
prefer [14] He prefers to eat at 7 PM.
prepare [8] They prepared to take the test.
pretend The child pretended to be a monster.
promise [8] She promised to stop smoking.
propose [14] Drew proposed to pay for the trip.
refuse The guard refused to let them enter the building.
regret [13] I regret to inform you that your application was rejected.
remember [13] Did you remember to lock the door when you left?
seem Nancy seemed to be disappointed.
start [13] Marge started to talk really fast.
swear She swore to tell the truth.
tend He tends to be a little shy.
threaten [8] He threatened to leave forever.
try [13] Mary tried to lift the table, but it was too heavy.
vow He vowed to get revenge.
wait She waited to buy a movie ticket.
want [8] I want to study Spanish.
wish [8] I wish to stay.
would like [8] (meaning “wish” or “want”) We would like to start now.
yearn Melanie yearns to travel somewhere exotic.

B. Causative Verbs and Original Form(使役动词和动词原型)

  1. The teacher made the little girl stay behind.
    • Causative verbs like “let/have/make/…” are followed by original forms of verbs, because their results are not uncertain, and can not be followed by infinitives
    • let/have/make等使役动词, 后面是接原型动词, 是因为它的结果不具有不确定性, 因而不能用不定式
  2. The teacher asked the little girl to stay behind.
  3. John had his car painted over.
    • Causative Verbs can also be followed by Ven (并不是使役动词后面只能用原型)

C. Verbs of Perception and Original Form (感官动词和动词原型)

  1. I heard her playingthe violin.
    • Verbs of Perception can only be used in what really happened, they come with present participle
    • 感官动词see/hear/watch, 只能配合确实发生过的事情, 可以和现在分词一起使用.
  2. I heard her cry out in pain.
    • 大叫一声, 叫声并不能持续, 所以不能用现在分词. 既不能用不定式, 也没有被动的语态, 所以只好用动词原型了

D. Gerunds

VI. Moods

A. Indicative (叙述事实的语气)

a. Now or in the past, true and false can be determined, so use the tone of narrative facts. The future has not yet happened. Strictly speaking, it is still not certain whether it is true or false. This is why adding the auxiliary verb before the verb in the future mode. Because the auxiliary verbs are uncertain. (现在和过去的事情, 真假已经可以确定, 所以用叙述事实的语气. 未来的事情还没有发生, 严格说来还不能确定真假, 这就是为啥未来式要在动词前加上助动词will, 因为助动词都带有不确定性.)
  1. He went to the U.S. last year.
  2. I will go to the U.S. next year to study for an MBA degree.
b. Can be calculated by formula, can be described as facts (可以用公式计算出来, 可以当作事实来叙述)
  1. The weatherman says sunrise tomorrow is at 5:32.
  2. The movie starts in 5 minutes. 同上
c. The clause describes two things in the future. It is necessary to assume that one of them is a fact, and then we can infer another one. So the clause uses the present form. (主从句同时叙述两件未来的事情, 需要先假定其中一件是事实, 才能推论另外一件. 所以从句用现在式)
  1. I’ll be ready when he comes.
  2. If you are late again, you will be fired.

B. Conditional (条件语气)

a. Adding an auxiliary verb to a sentence, producing an indeterminate tone, called conditional tone (句子中加上助动词, 产生不确定的语气, 称为条件语气)
  1. You are right.
    • → You may be right.
  2. The doctor thinks it can be AIDS.
    • → It could be anything - AIDS or a common cold.
b. Use the perfect expression to infer which happened in the past (用完成式表达对过去的猜测)
1
2
3
4
5
must → should
will → would
can → could
may → might
It does not represent a change in time, but rather a more uncertain tone. It need a special way to express the past time. (并不代表时间上的变化, 而是表示更不确定的语气, 要用一种特别的方式来表达过去时间)
  1. It may rain any minute now.
    • → It may have rained a little last night.

C. Subjunctive (假设语气)

Time 从句 主语
要把假设条件当真, 所以不能用表示不确定性的助动词 在一个假定条件下”就会/就可能”有啥结果, 所以用过去拼法的助动词
现在时间 现在式 → 过去式 过去拼法的助动词 + V(动词原型)
If I were you I wouldn’t do it
If I were to take the bribe I could never look at other people in the eye again
过去时间 过去式 → 过去完成式 过去拼法的助动词 + have + Ven(完成)
If I had known earlier I might have done something
If the bear had been more than just curious Things might have turned out a little differently
未来时间 过去拼法的助动词 + V(动词原型) 过去拼法的助动词 + V(动词原型)
未来时间接近条件语气, 表示不确定的语气 If an asteroid should hit the earth man could die out
If I should take the money could you guarantee secrecy
过去 + 现在 If I had studied harder in school I could qualify for the job now
混合真假 If I had have any money with me(false) → only that I didn’t have any money with me(true) I could have contributed to the fund drive then
句型变换 It’s time you kid were in bed
If only I had more time!
I wish I had more time!

D. Imperative (祈使语气)

VII. Reduced Clauses

A. 通用规则

a. 省略从句中的主语和Be动词, 只留补语
  1. Whether it is insured or not(副词从句), your house, which is a wooden building(形容词从句), needs a fire alarm.
    • → Whether insured or not, your house, a wooden building, needs a fire alarm.
  2. It is common courtesy that one should( → is to) wear black(名词从句) while one attends( → is attending) a funeral(副词从句).
    • → It is common courtesy to wear black while attending a funeral.
b. 没有Be动词如何处理
  1. 有助动词 → 不定式
    • He studied hard so that he could get a scholarship.
      • → He studied hard so that he was (able) to get a scholarship.
      • → He studied hard to get scholarship.
    • 省略后意思如果不清楚可以如此补充
      • He studied hard so as to get scholarship.
      • He studied hard in order to get a scholarship.
  2. 没有助动词 → Ving
    • John remembers that he saw the lady before.
      • → John remembers seeing the lady before.

B. 形容词从句(关系从句)的简化

a. 补语为Ven
  1. Beer which is chilled to 6 ℃ is most delicious.
    • → Beer chilled to 6 ℃ is most delicious.
  2. Your brother John, who was wounded in war, will soon be sent home.
    • → Your brother, wounded in war, will soon be sent home.
b. 补语为Ving
  1. The ship which is coming to shore is from Gaoxiong.
    • → The ship coming to shore is from Gaoxiong.
  2. My old car, which break down every other week, won’t last much longer.
    • → My old car, breaking down every other week, won’t last much longer.
      👉 通用规则b
c. 补语为不定式
  1. John is the one who should go this time.
    • → John is the one to go this time.
  2. 关于不定式主动和被动的问题, 下面两句都是👌的
    • John is not a man whom one can trust
      • → John is not a man one can trust
      • → John is not a man to trust.
    • John is not a man who can be trusted
      • → John is not a man to be trusted.
d. 补语为形容词或名词
  1. Hilary Clinton, who is pretty and intelligent, is a popular First Lady.
    • → Hilary Clinton, pretty and intelligent, is a popular First Lady.
  2. Bill Clinton, who is President of the U.S., is a Baby Boomer.
    • → Bill Clinton, President of the U.S., is a Baby Boomer.

C. 名词从句的简化

a. 简化后剩下的补语式Ving形态时
  1. That I drink good wine with friends is my greatest enjoyment.
    • → Drinking good wine with friends is my greatest enjoyment.
  2. Many husbands enjoy that they do the cooking.
    • → Many husbands enjoy doing the cooking.
  3. He got used to(介词) working late into the night.
  4. His favorite pastime is that he goes fishing on weekend.
    • → His favorite pastime is going fishing on weekend.
  5. 主语不能够省略
    • S+V+O+C
      • I imagined that a beautiful girl was singing to me.
        • → I imagined singing to myself.
        • → I imagined a beautiful girl singing to me.
    • 用所有格
      • That he calls my girlfriend every day is too much for me.
        • → Calling my girlfriend every day is too much for me.
        • → His calling my girlfriend every day is too much for me.
b. 简化后剩下的补语式Ven形态时, 无法取代名词
  1. That anyone is called a liar is the greatest insult.
    • → Called a liar is the greatest insult. (Wrong)
    • → Being called a liar is the greatest insult.
  2. I am looking forward to(介词) being invited to the party
c. 名词从句中是单纯的be动词
  1. That one is a teacher requires a lot of patience.

    • → Being a teacher requires a lot of patience.
  2. That he was busy is no excuse for the negligence.

    • → Being busy is no excuse for the negligence.
d. 简化后剩下的补语是to V形态
  1. The children expect that they can get presents for Christmas.

    • → The children expect to get presents for Christmas.
  2. I think it strange that man should fear ghosts.

    • → I think it strange to fear ghosts.
  3. 主语不合适省略

    • I want that you should go.
      • → I want you to go.
e. 疑问句的名词从句简化, 疑问词要保留, where to/how to/when to
  1. I don’t known what I should do.

    • → I don’t known what to do.
  2. I can’t decide whether I should vote for Mary(or not).

    • → I can’t decide whether to vote for Mary.

D. 副词从句的简化

a. 简化为Ving补语
  1. While he was lying on the couch, the boy fell asleep.
    • → While lying on the couch, the boy fell asleep.
b. 没有Be动词与助动词时
  1. Because we have nothing to do here, we might as well go home.
    • → Having nothing to do here, we might as well go home.
  2. Although we have nothing to do here, we can’t leave early.
    • → Although having nothing to do here, we can’t leave early. 这种相反的逻辑关系要用although来表示, 所以although不能省略
    • → Having nothing to do here, we still can’t leave early.
c. 副词从句中的动词单纯是Be
  1. As I am a student, I can’t afford to get married.
    • → Being a student, I can’t afford to get married.
    • → As a student, I can’t afford to get married.
  2. Before he was in school, he used to be a naughty child.
    • → Before being in school, he used to be a naughty child.
d. 时态的问题
  1. After he wrote the letter, he put it to mail.
    • → After writing the letter, he put it to mail.
    • → Writing the letter, he put it to mail.(Wrong)
    • → Having written the letter, he put it to mail.
  2. When he had written the letter, he put it to mail.
    • → Having written the letter, he put it to mail.

VIII. Preposition

A. Space

a. spot → at
  1. Let’s meet at the railway station.
b. line → on, along
  1. Then we can go over the project on our way to Gaoxiong.
  2. We may go walking through the windy park, or drive along the beach.
c. face → on
  1. Several boats can be seen on the lake.
  2. on the internet/on Facebook/on Twitter
d. cube → in
  1. It’s cool in the railway station, because they have air-condition.

B. Time

a. moment → at
  1. The earthquake struck at 5:27AM
b. during → in
  1. Typhoon seldom come in Winter.
c. special time → on
  1. There’ll be a concert on New Year’s Day.

IX. Article

Architecture on iOS

Posted on 2018-04-28 | Edited on 2018-05-02

Why we need to choice an architecture before we write a program on iOS

The critirias of evaluration of architecture

The History of architectures

Design Paradiam and Design Principle

SRP

Single Responsibility Principle
How to use SRP properly with clean Architecture. Every module or class should have responsibilty over a single part of the functionality provided by the software.

MVC

Apple’s MVC

MVC introduced by Appll is stands for Massive View Controller. It is funny, but it is ture. But It is not the fault of the architecture, It depented on how we use it correctly. The architecture doesn’t tell us how to use it correctly and where to put all other responsibilty we need.

MVVM

MVVM with RxSwift

MVVM with RxSwift and Coordinattor

MVVM with ReSwift

Clean Architecture

Clean architecture explicitly divides some responsibilities among its classes: the presenters bridge the divide between UI and business logic, the interactors handle our use-cases, routers help us get to new scenes, etc.

Clean architecture has become quite popular on Apples platforms and for a good reason. There are even several approaches we can choose from, like VIPER [4] and Clean Swift [3].

The interactor contains the applications business logic but there’s only one interactor per view controller.

Clean Swift

In my opinion, in complex scenes, the interactor shouldn’t really do anything interesting. No algorithms, no database or parsing, nothing that requires a nested if statement or a loop. This belongs in Worker classes. The responsibility of the interactor will be delegating work to its workers and passing the results to the presenter.

In clean architecture, an interactor should represent a single use case.

VIPER

I heard many people say that VIPER is very complicated.

Router

References

Cleaner Architecture on iOS

my first blog

Posted on 2018-03-07 | Edited on 2018-07-31 | In bio

This is my blog

It’s Me

Qubo Qin

7 posts
6 categories
46 tags
© 2019 Qubo Qin
Powered by Hexo v3.8.0
|
Theme – NexT.Muse v6.7.0
|